LeadCatch setup guide
Everything you need to install LeadCatch, connect your HubSpot account, and start turning inbound lead emails into clean contacts. The whole setup takes a few minutes, and no technical work is required.
What LeadCatch does
Boat and car dealers get leads by email from a dozen listing platforms — CarGurus, Boat Trader, AutoTrader, Cars.com, Facebook Marketplace, dealer-site forms — each in its own format. LeadCatch connects to your HubSpot Conversations inbox and, the moment one of those emails arrives, it:
- Reads the email and pulls out the lead's name, email, phone, and the listing they asked about.
- Creates or updates a contact in HubSpot, deduplicated against people you already have.
- Tags the lead source so you always know which platform the inquiry came from.
- Attaches a note with the full inquiry, building a complete history on the contact.
It runs automatically in the background and works in any HubSpot tier — no custom objects, no extra setup inside HubSpot.
Install the app
Start the install from the button below (or from the LeadCatch landing page). It takes you straight to HubSpot to choose an account.
Install LeadCatch →- 01 Click Install LeadCatch above (or Install app on the Marketplace listing).
- 02 You will be taken to HubSpot to choose which account to connect.
- 03 Sign in to HubSpot if you are not already, and pick the account you want LeadCatch to work with.
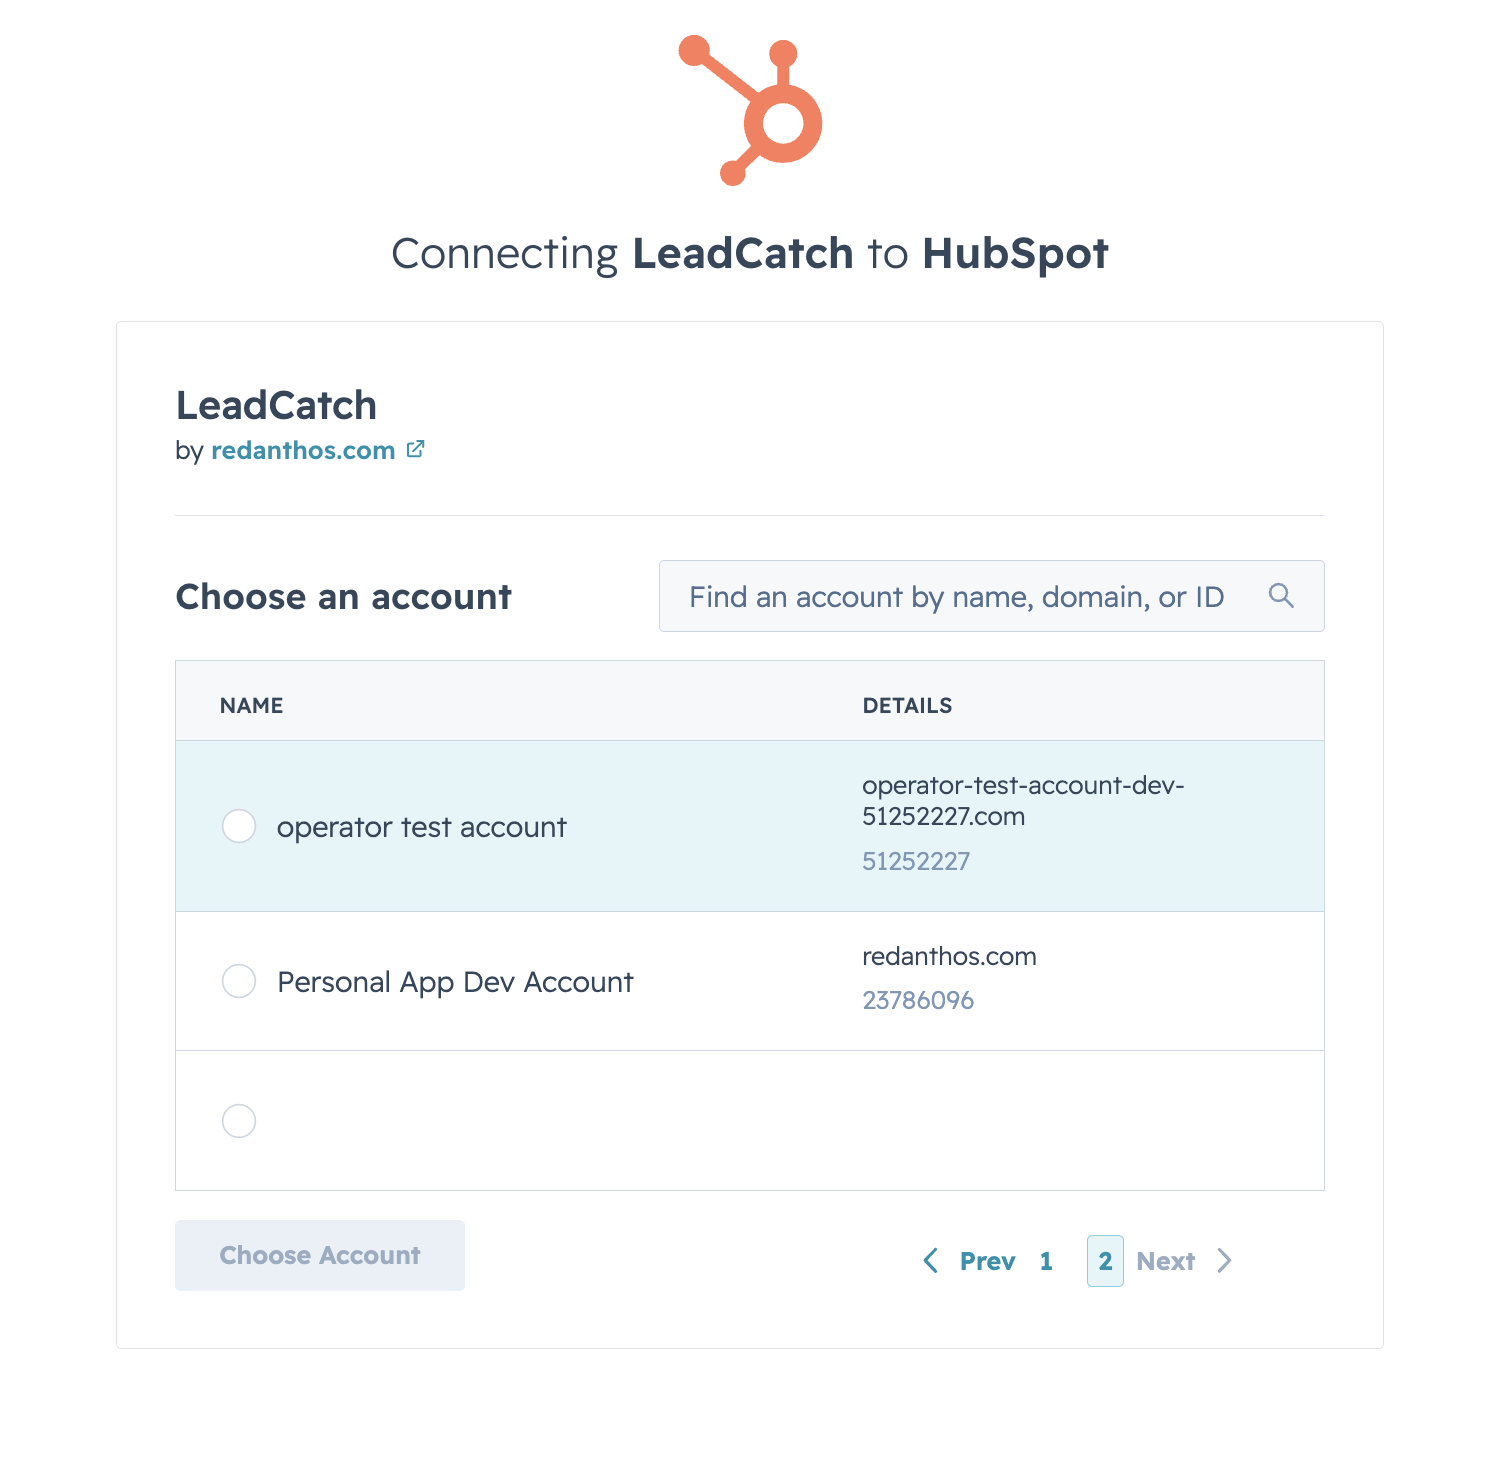
Connect your HubSpot account
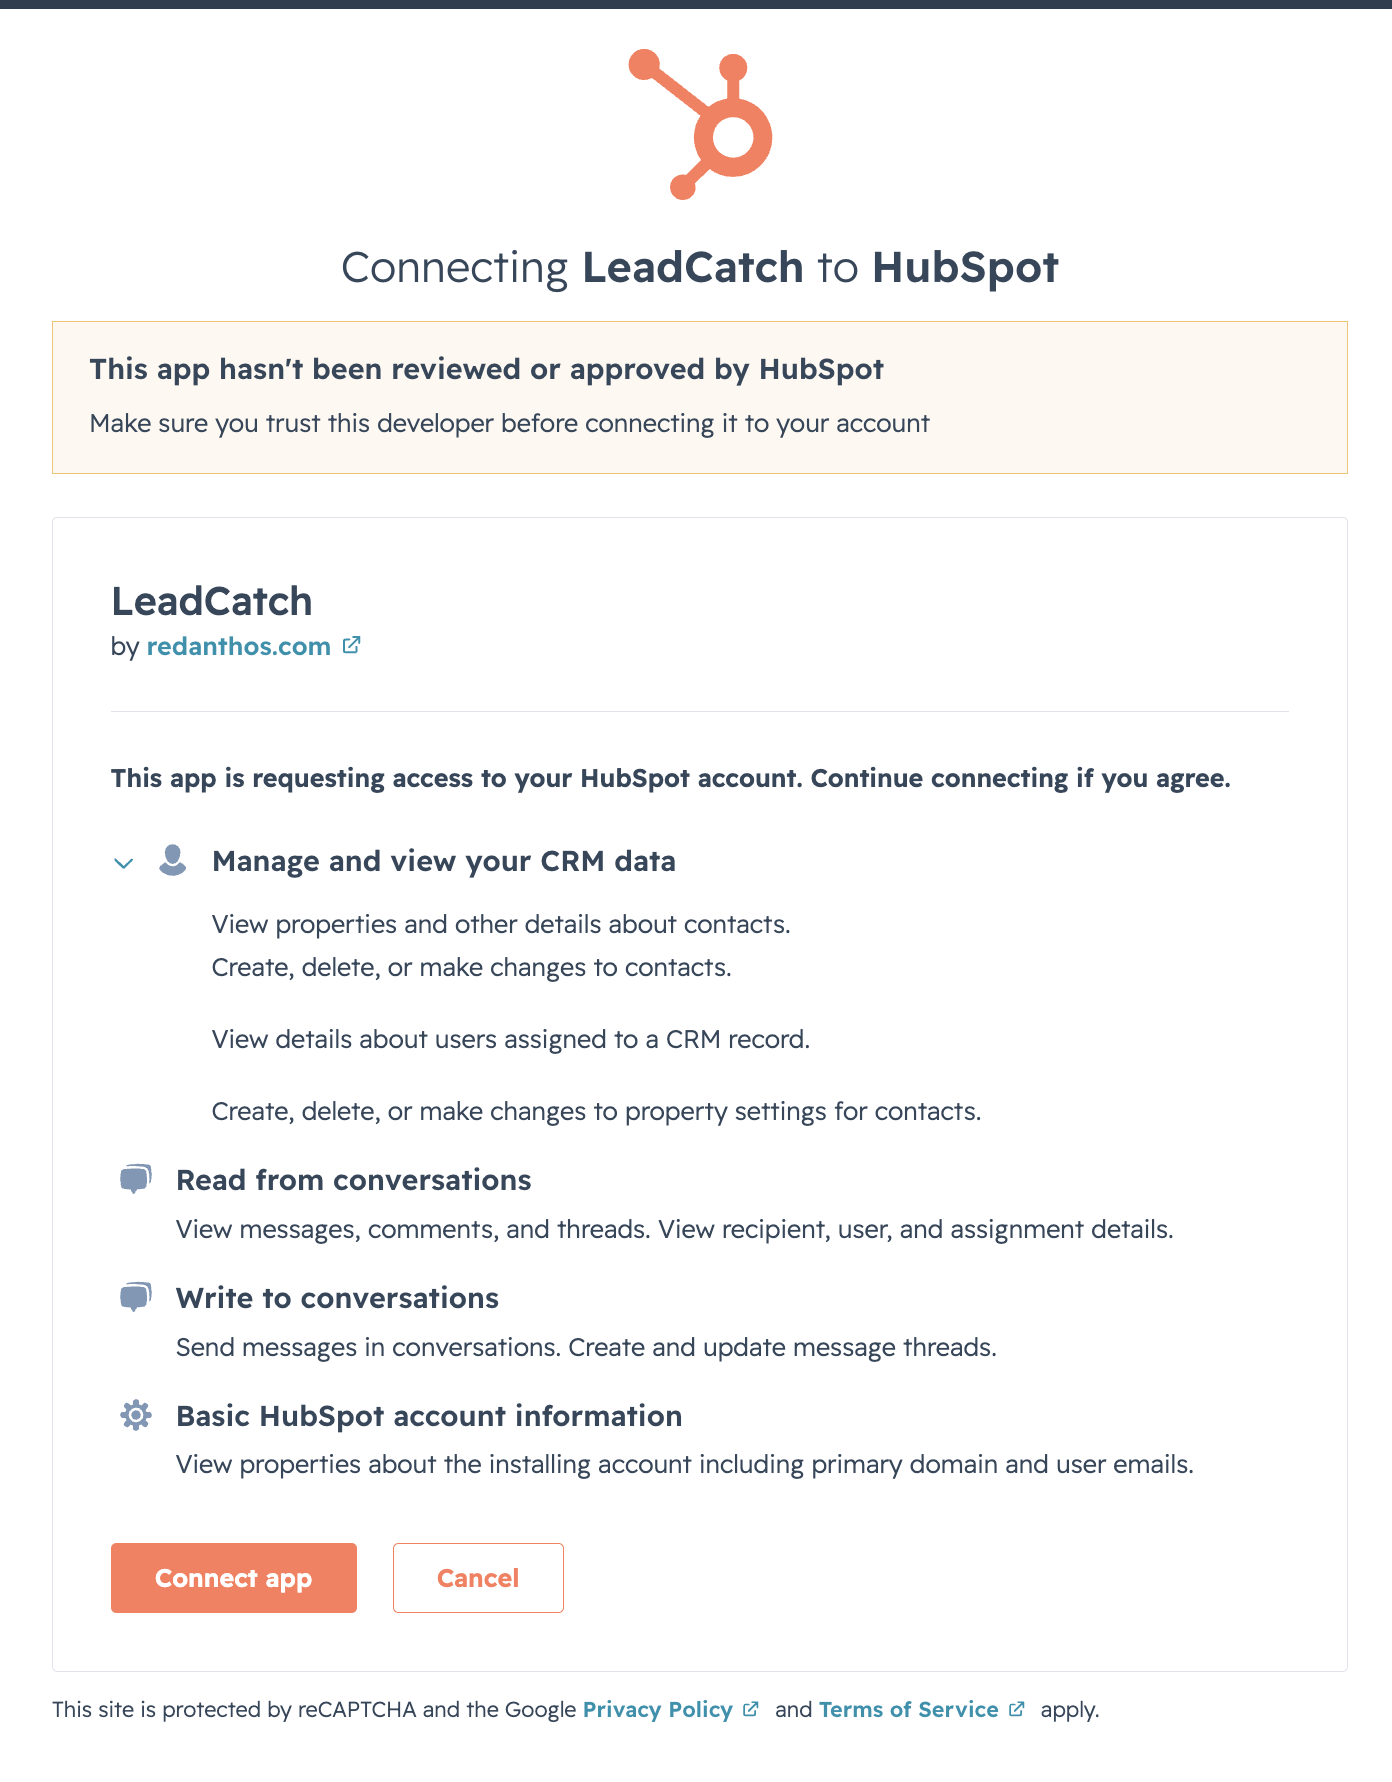
After choosing your account, HubSpot shows you exactly what LeadCatch is allowed to do. Review the requested permissions and click Connect app to authorize. LeadCatch requests:
Contacts
Find, create, and update contacts, and attach an email activity to each one.
Contact properties
Add the LeadCatch Lead source property on install.
Owners
Read your team members so leads can be assigned to an owner.
Conversations
Read new messages in your inbox and post a confirmation reply.
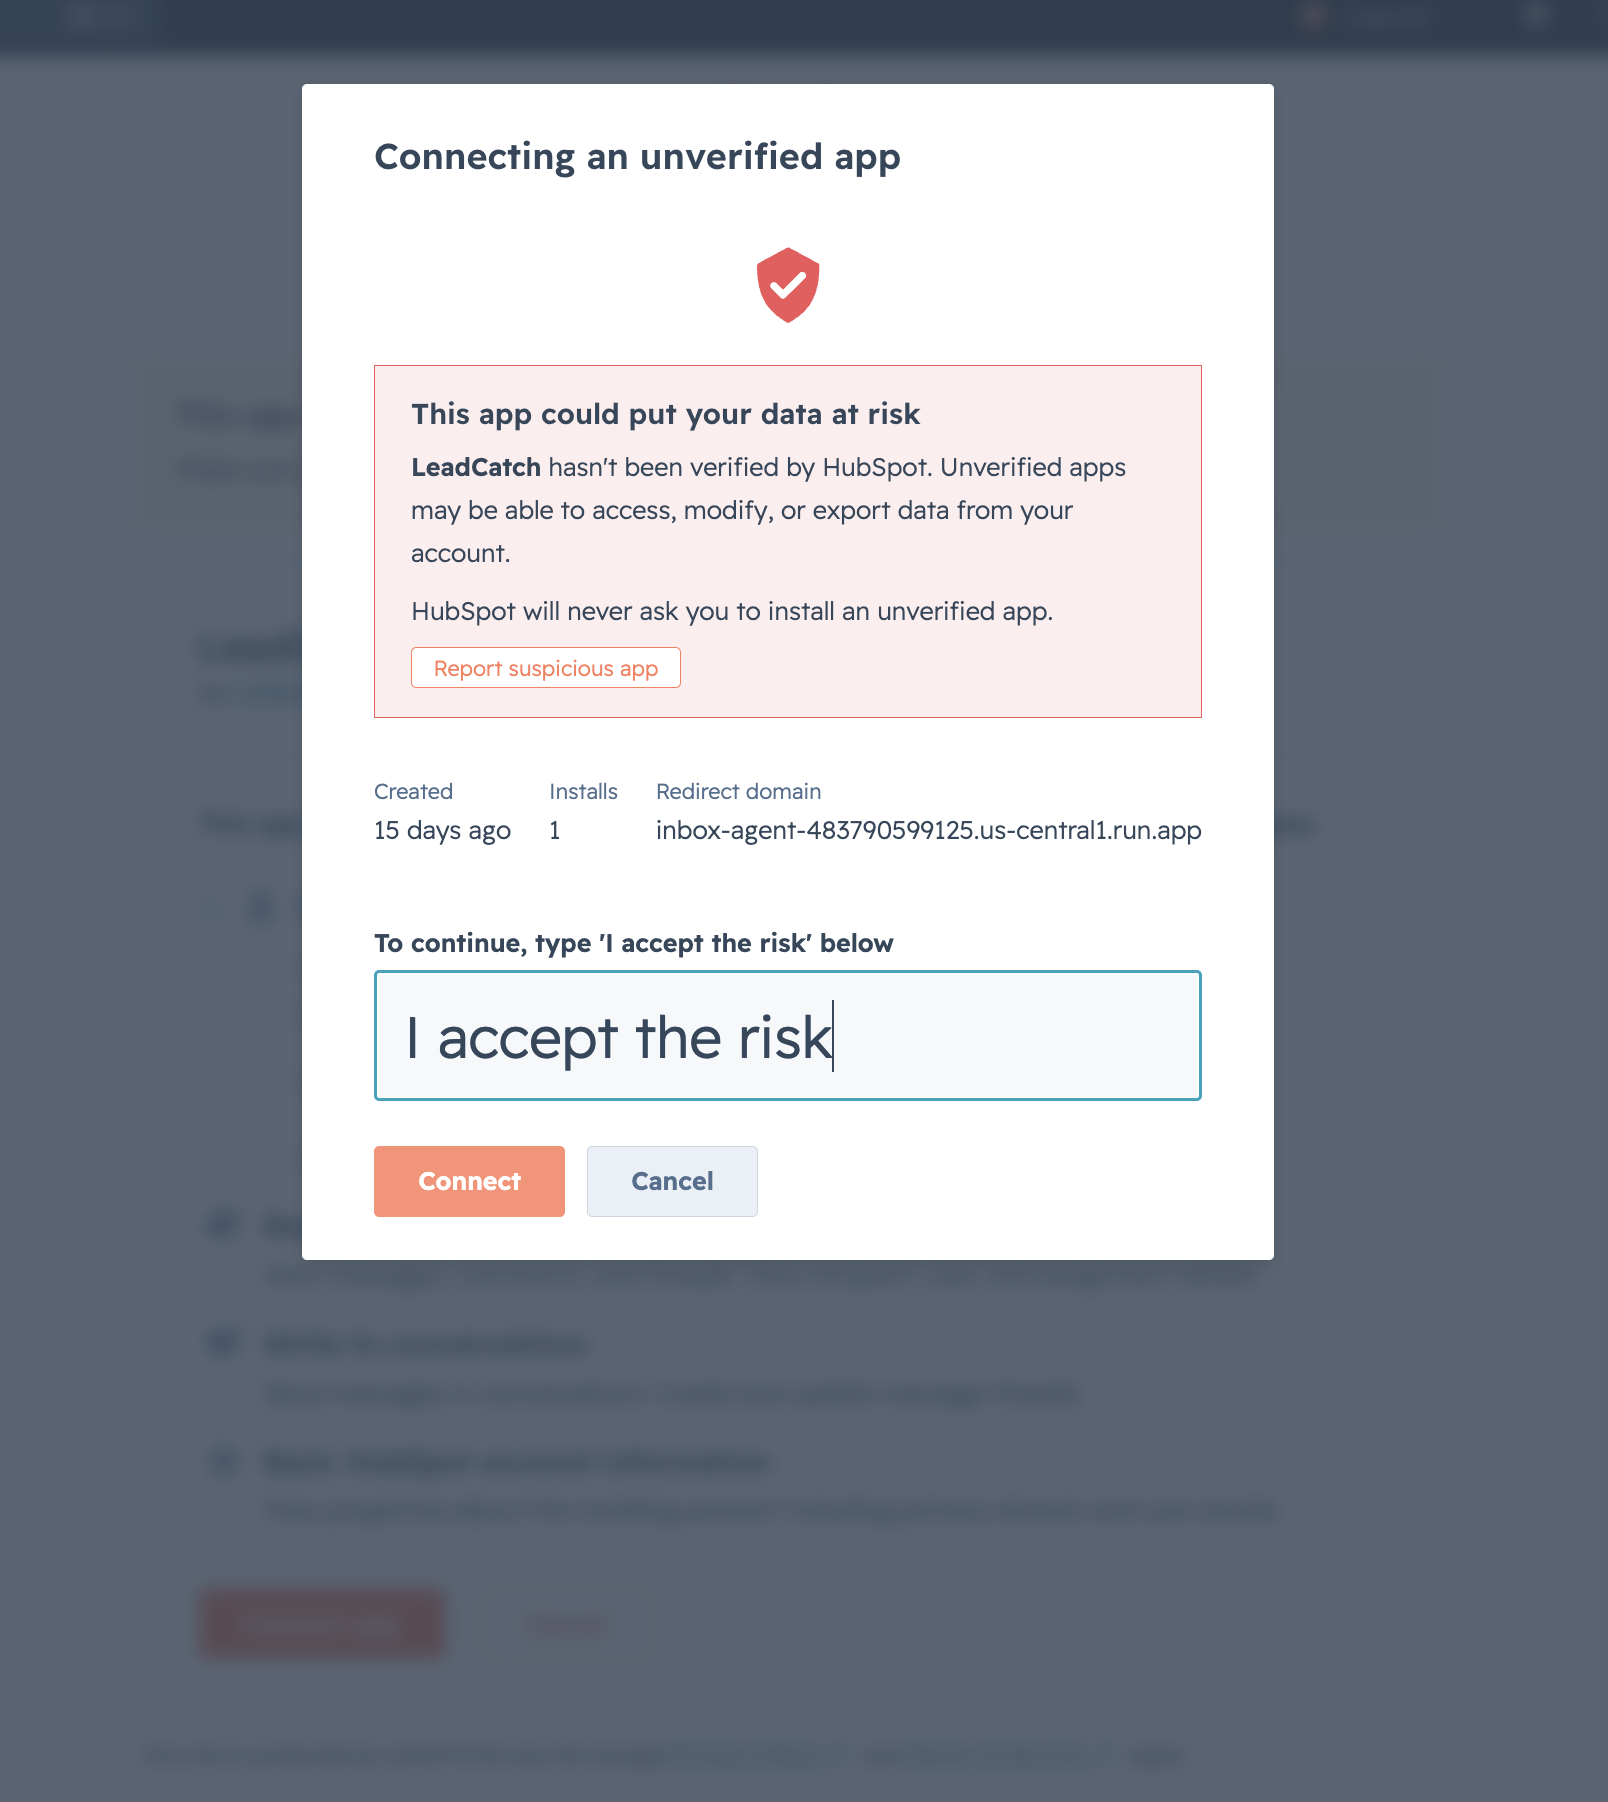
Because LeadCatch is a new app that HubSpot has not yet finished reviewing, HubSpot shows an “unverified app” notice before it lets you continue. To proceed, type I accept the risk in the box and click Connect.
Once you approve, you are returned to LeadCatch and the connection is live. That is the whole connection step.
Set up billing
LeadCatch is a paid subscription, and it only starts processing your inbox once you have an active plan. Billing runs through your Red Anthos account, so you manage payment in one place — separate from HubSpot.
- 01 Sign in to (or create) your Red Anthos account when LeadCatch prompts you during onboarding.
- 02 Choose the plan that fits your lead volume — each plan includes a monthly allotment of processed leads, with per-lead pricing beyond it.
- 03 Complete checkout. Payment is handled securely by Stripe through the Red Anthos billing portal.
- 04 Once your subscription is active, LeadCatch begins processing new lead emails automatically.
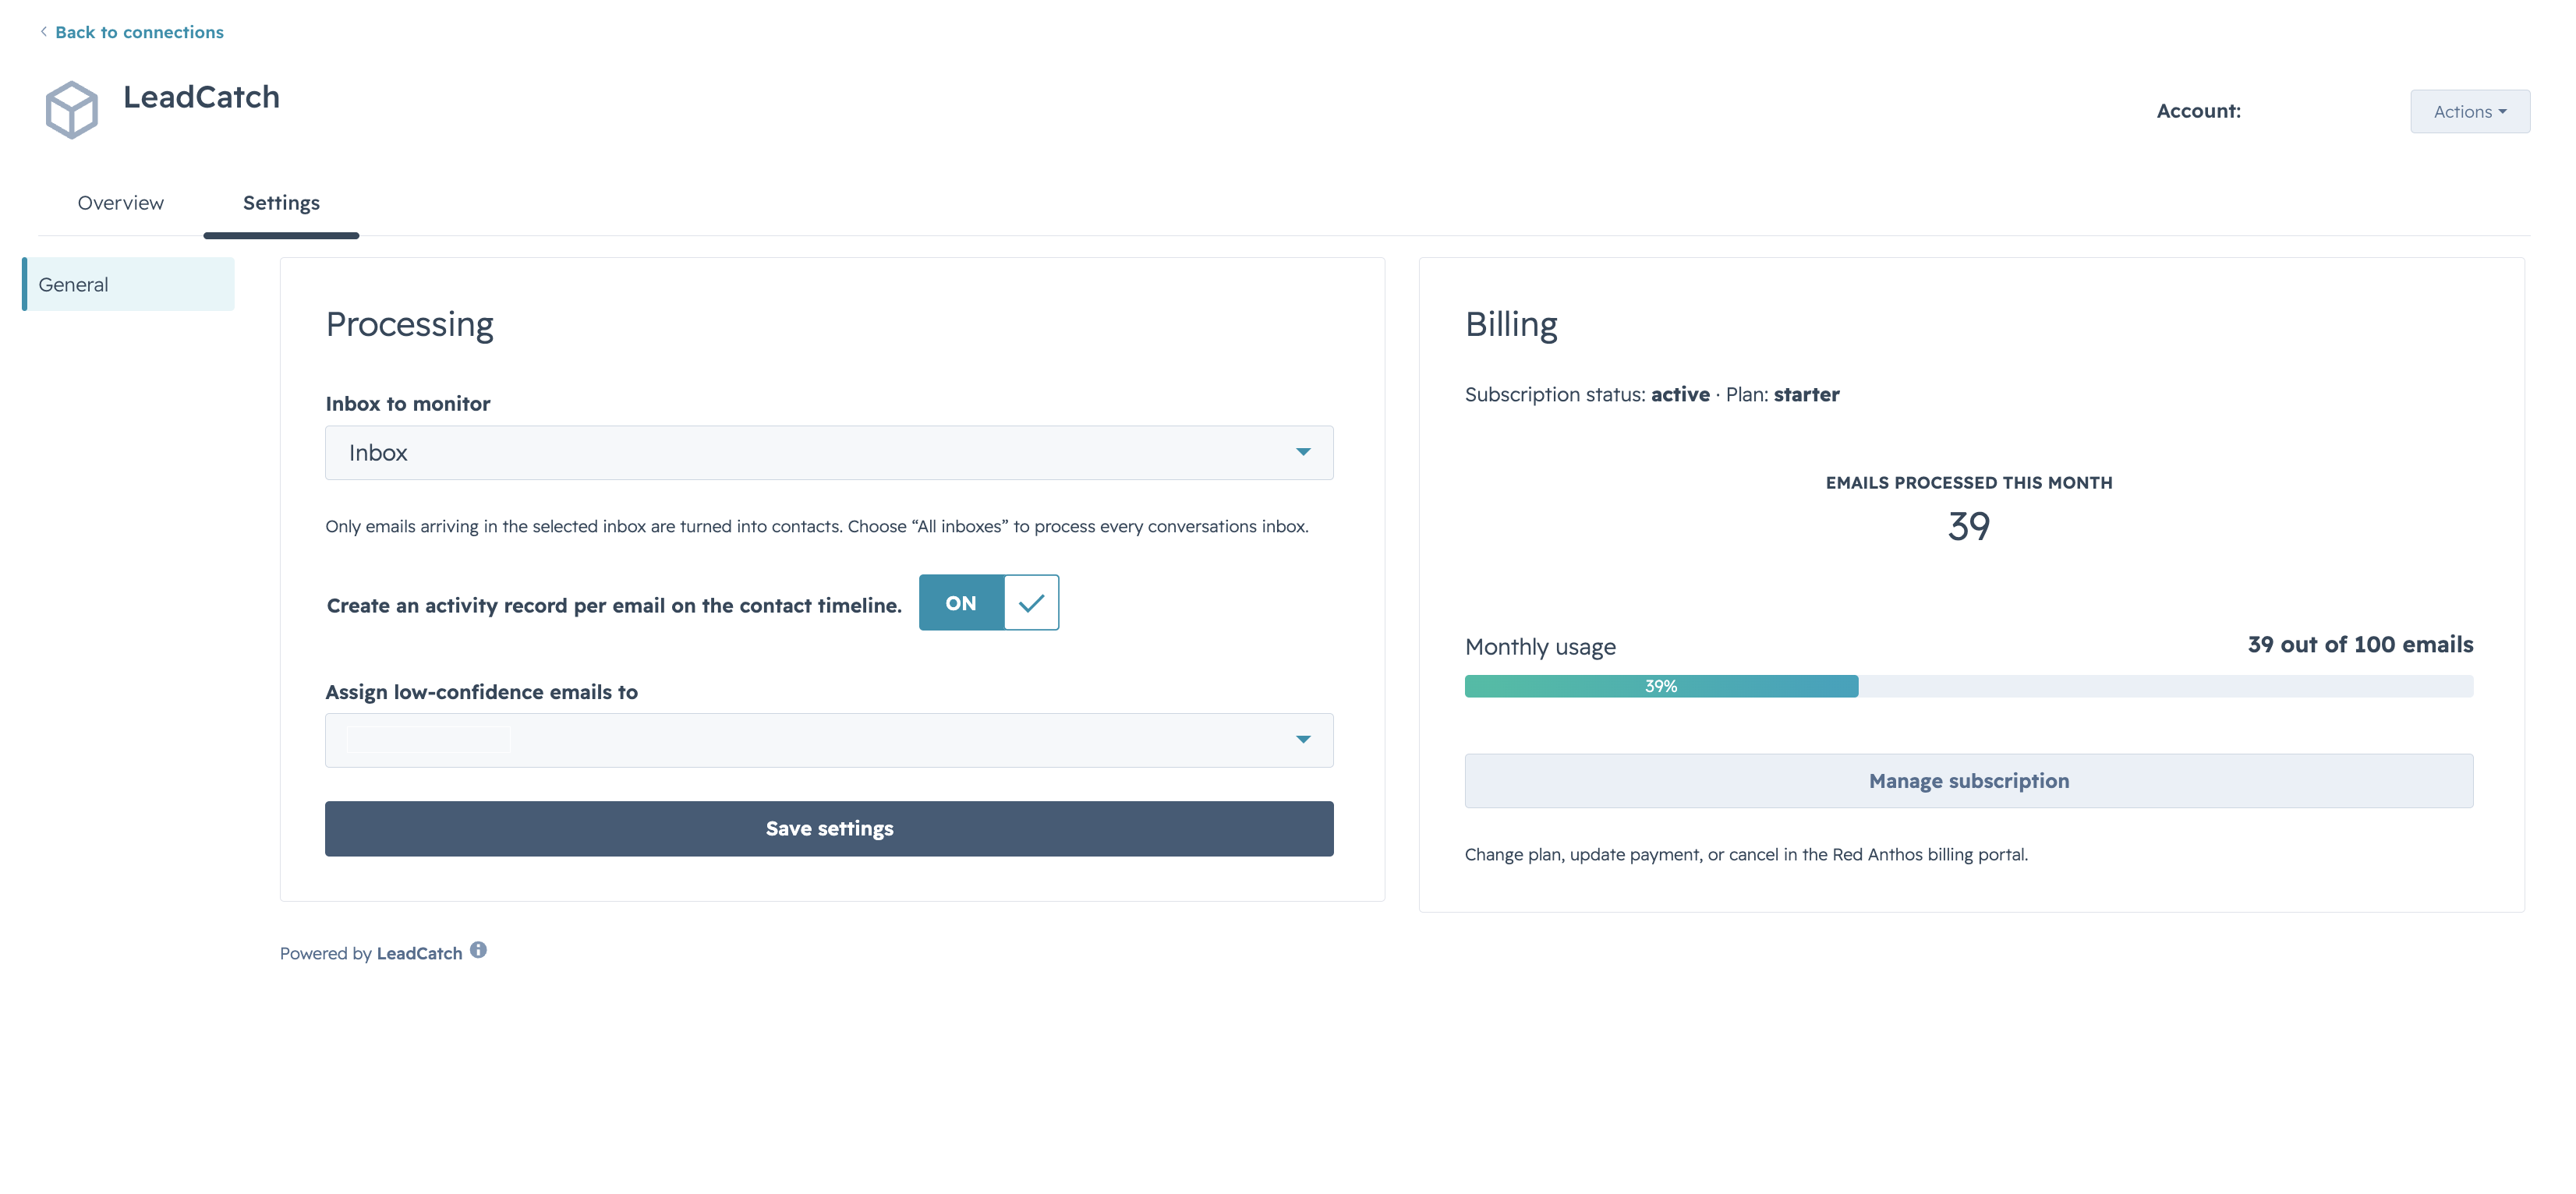
You can review your plan, this month’s usage, and the Manage subscription link any time from the LeadCatch Settings tab. See the pricing page for current plans and allotments.
Until billing is active
LeadCatch checks for an active subscription before it does any processing, so an unpaid portal is never charged and no lead emails are read until your plan is live.
Configure the app
Once connected, open the LeadCatch Settings tab to tell it which inbox to watch and how to handle leads.
- 01 Inbox to monitor — pick the HubSpot inbox your lead emails arrive in, or choose "All inboxes" to process every conversations inbox.
- 02 Create an activity record per email — leave this ON to attach the full inquiry to each contact’s timeline.
- 03 Assign low-confidence emails to — choose the owner who should review leads LeadCatch is not sure about, then click Save settings.
The same screen shows your Billing status and this month’s usage, and links to the Red Anthos billing portal to change plan, update payment, or cancel.
Use the app
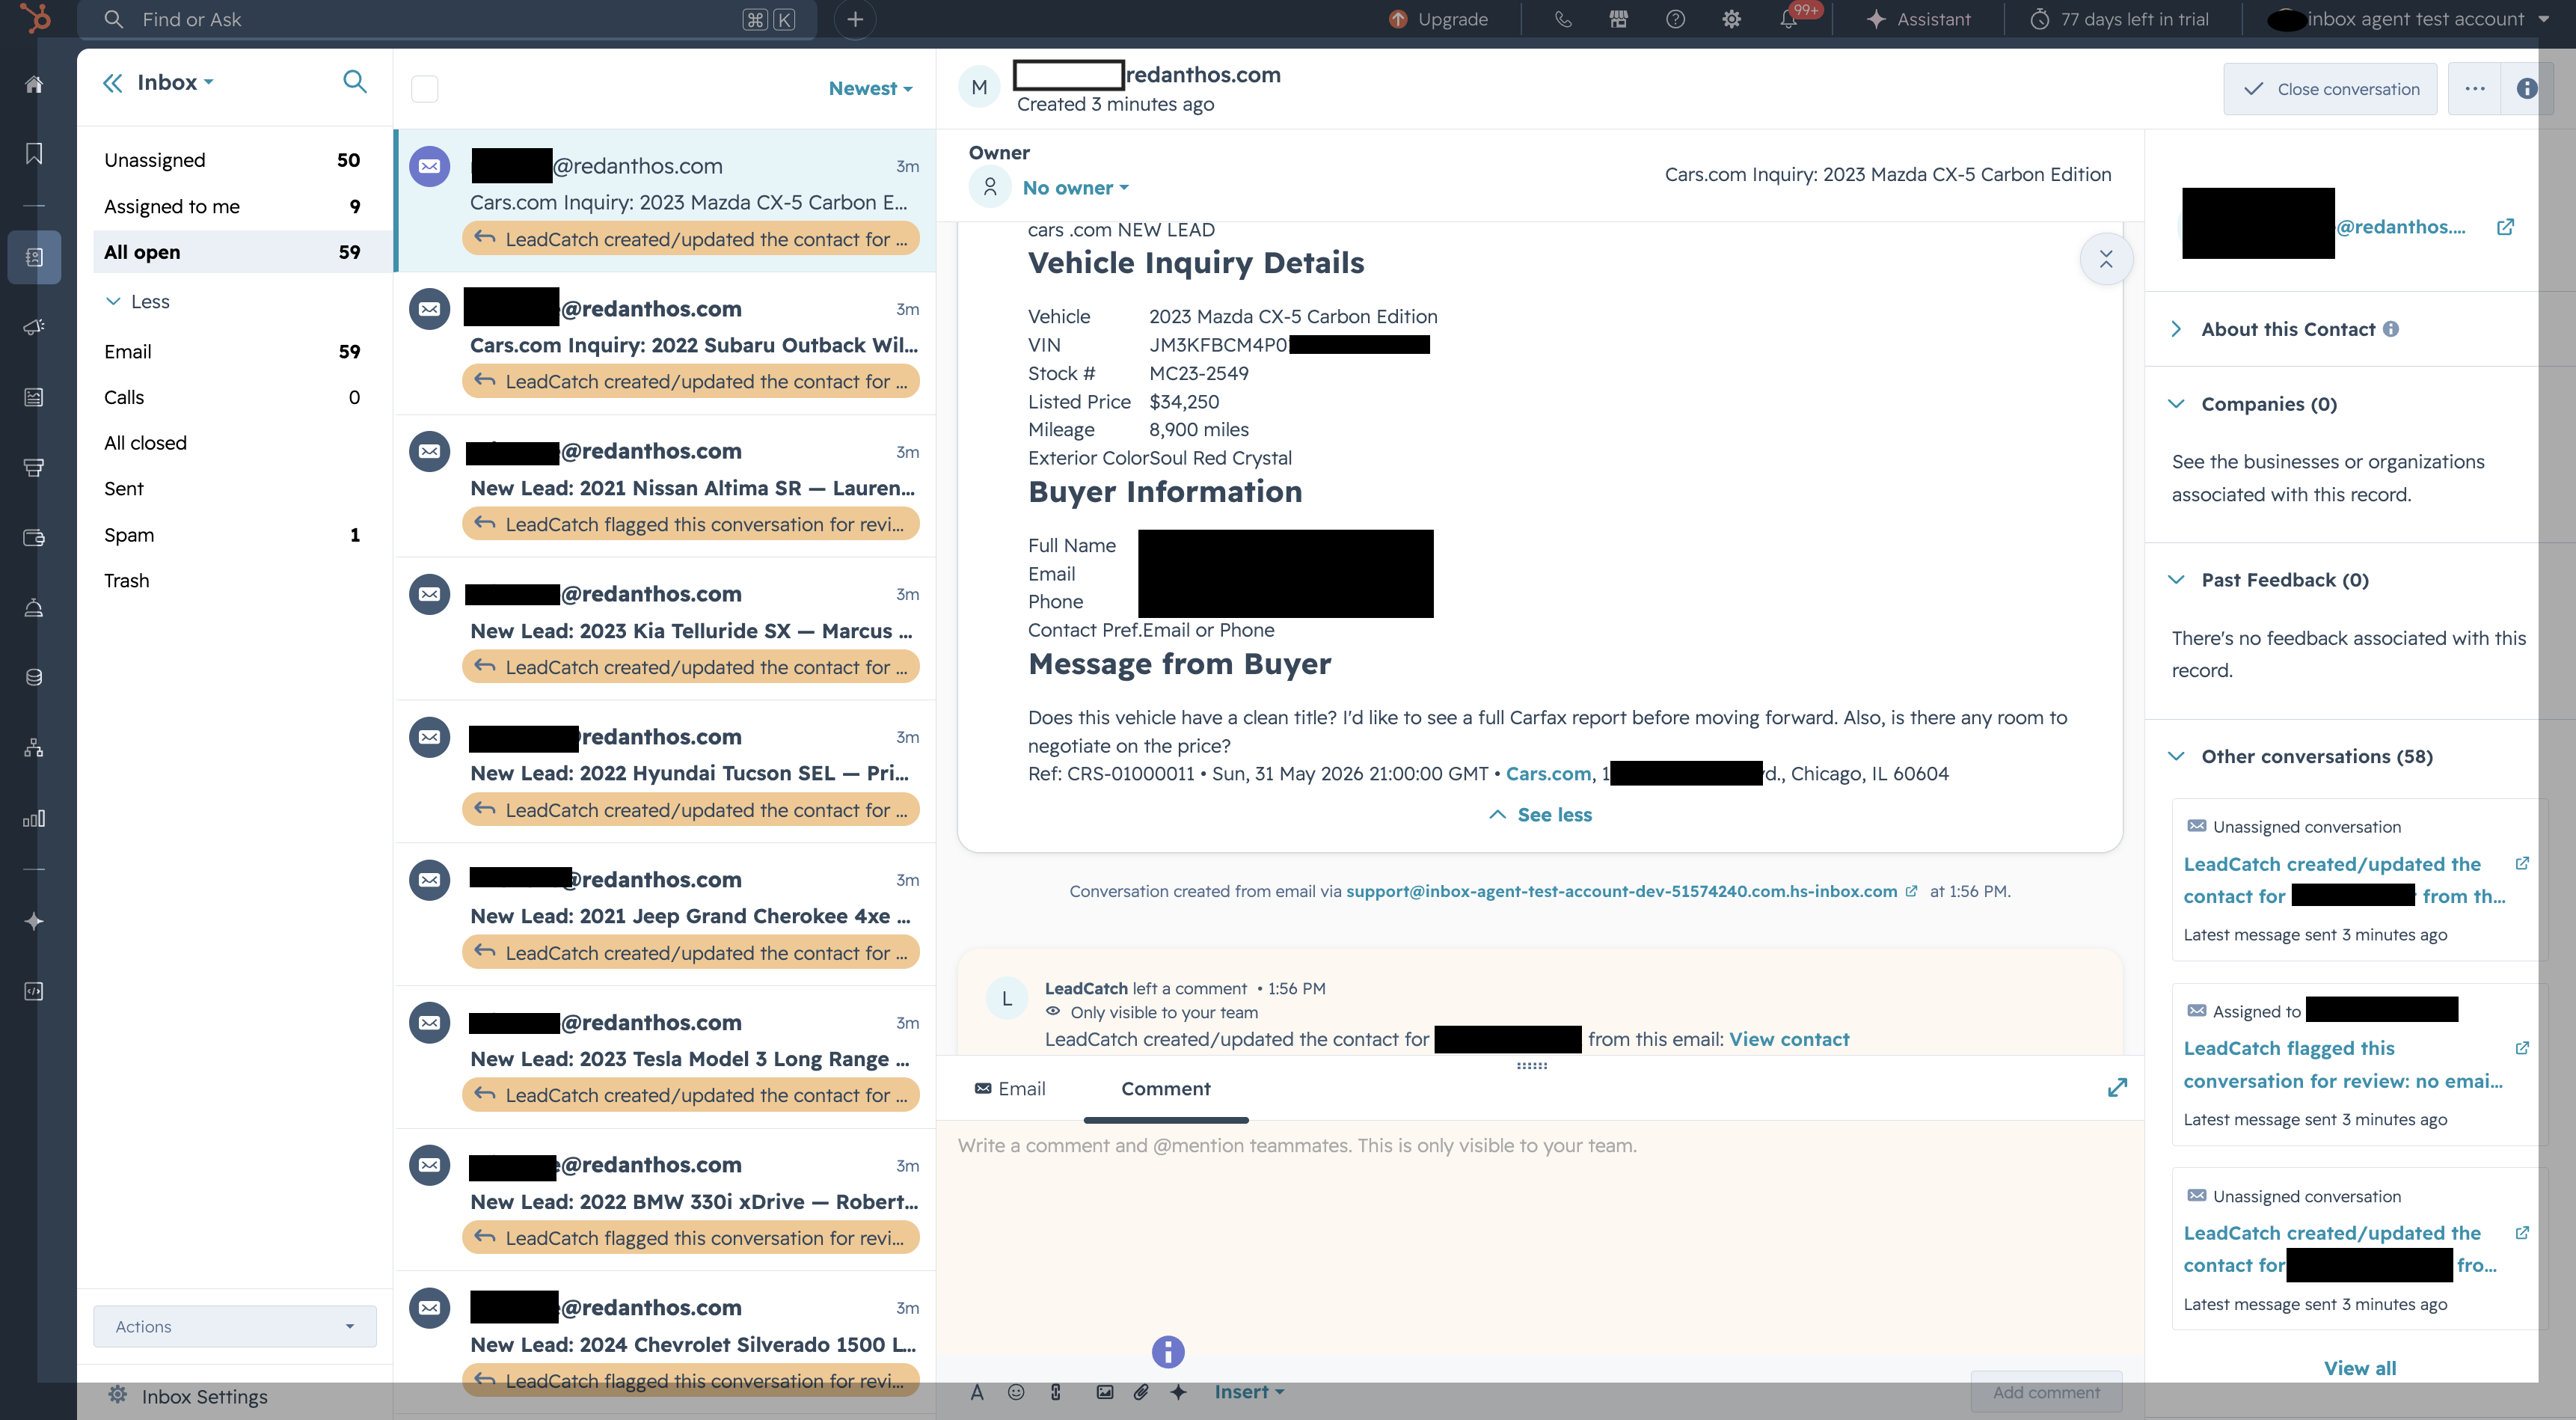
LeadCatch works automatically — there are no manual actions required. Once connected, every new lead email in your inbox is processed within moments of arriving:
- 01
A lead email arrives in your connected HubSpot inbox from any listing platform.
- 02
LeadCatch reads the message and pulls out the name, email, phone, and the unit they asked about.
- 03
It checks for an existing contact and either updates that person or creates a new one — no duplicates.
- 04
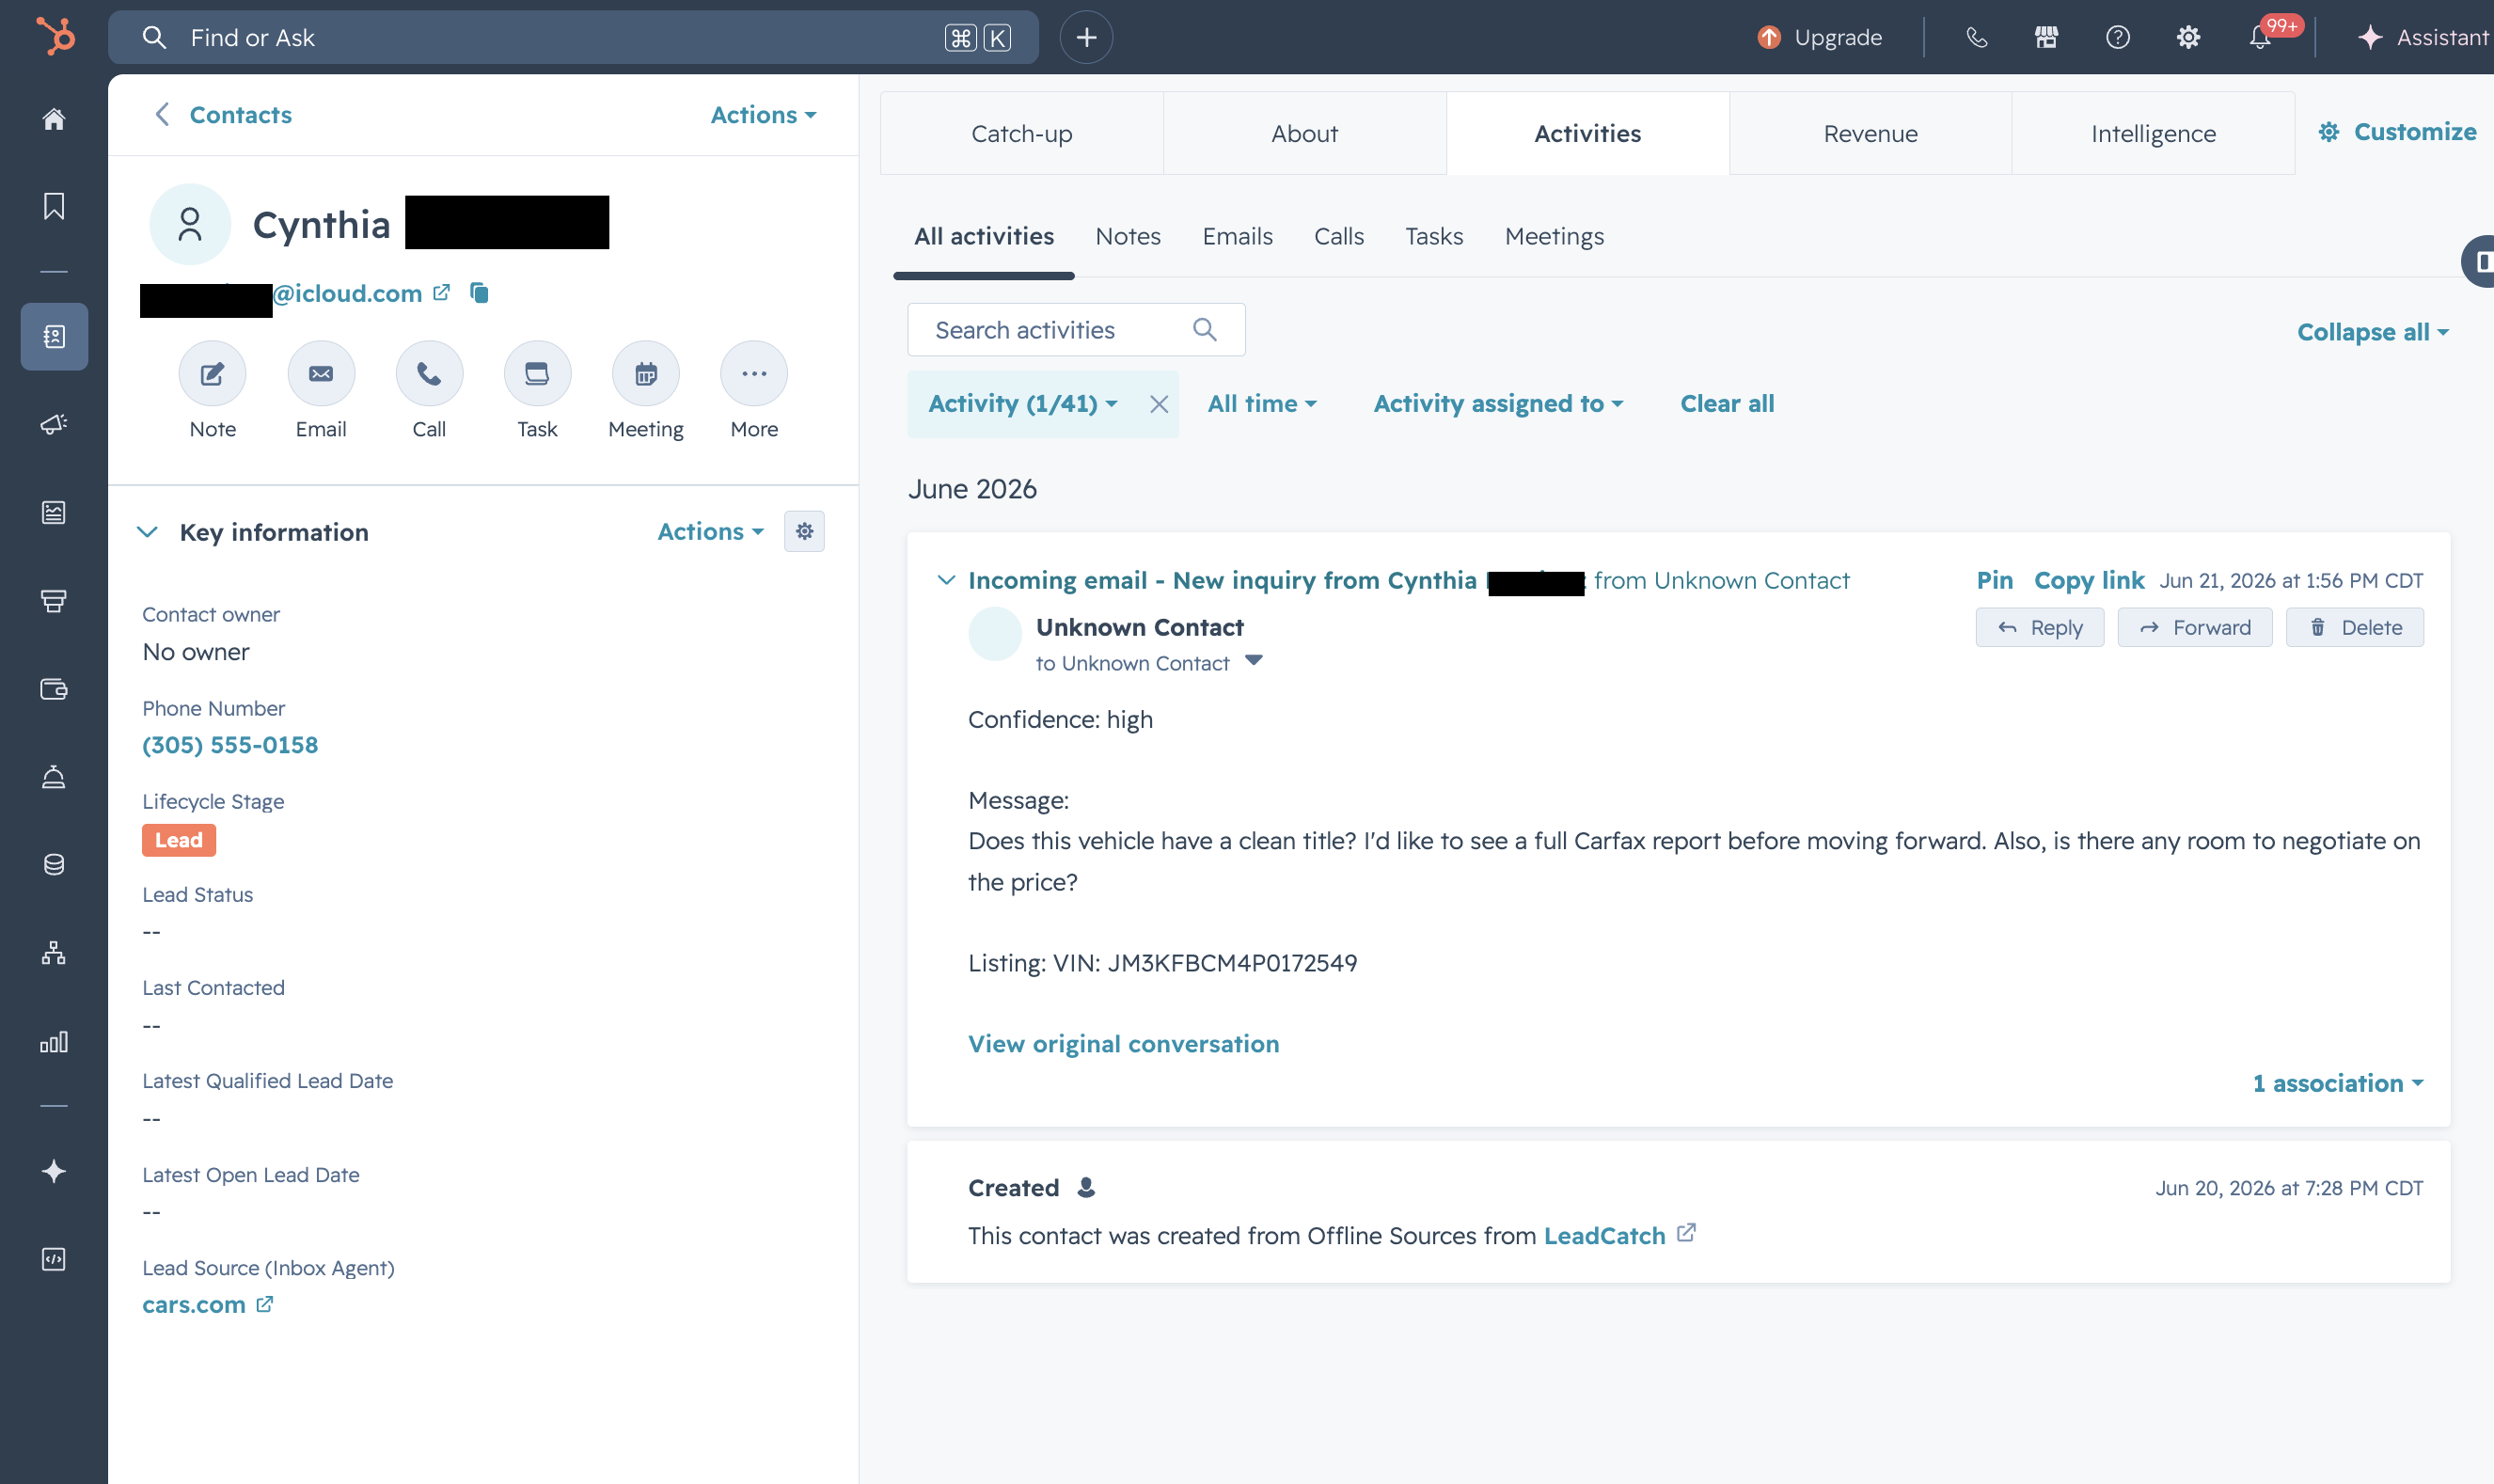
The contact is tagged with the lead source and a email activity with the full inquiry is attached.
Notifications and marketing emails that are not real leads are ignored, so your CRM stays clean. You can find every captured lead by looking at your HubSpot contacts — filter by the LeadCatch Lead source property to see where each one came from, and open any contact to read the attached inquiry notes.
Breeze AI tools
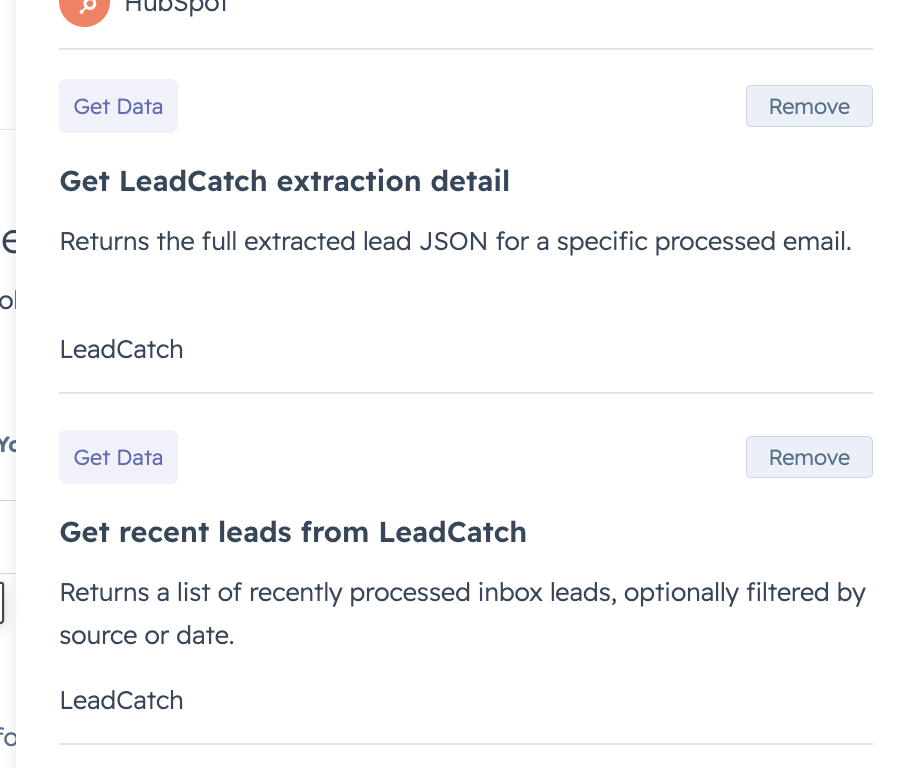
LeadCatch plugs into Breeze, HubSpot’s built-in AI assistant. It adds a pair of data tools that let Breeze pull your processed-lead data from LeadCatch on demand — so you can ask Breeze about your leads in plain language and it answers using what LeadCatch extracted, without you leaving HubSpot.
Get LeadCatch extraction detail
Returns the full extracted lead JSON for a specific processed email — every field LeadCatch pulled out of the message.
Get recent leads from LeadCatch
Returns a list of recently processed inbox leads, optionally filtered by source or date.
When you ask Breeze something like “show me the latest leads from Cars.com” or “what did this buyer ask about,” Breeze calls the matching tool and reads the answer straight from LeadCatch. The tools are read-only — they return lead data and never change anything in your CRM. You can add or remove them from the Breeze settings in HubSpot at any time.
Shared data & permissions
This is exactly what flows between LeadCatch and HubSpot, matching the permissions you approve on install.
| HubSpot data | Direction | How LeadCatch uses it |
|---|---|---|
| Contacts | Bi-directional | LeadCatch reads your contacts to match an incoming email to an existing person, and creates or updates a contact — plus an email activity on it — when a new inbox conversation arrives. |
| Contact properties | Write | On install, LeadCatch adds a new "LeadCatch Lead source" property to your contacts so each lead is attributed to the platform it came from. |
| Owners | Read | LeadCatch reads your HubSpot owners so a ambiguous lead can be assigned to the right salesperson. |
| Conversations | Bi-directional | LeadCatch reads new messages in your connected inbox to turn them into contacts, and can post a short confirmation reply to the thread once a contact is created or updated. It never deletes messages. |
Cancel your subscription
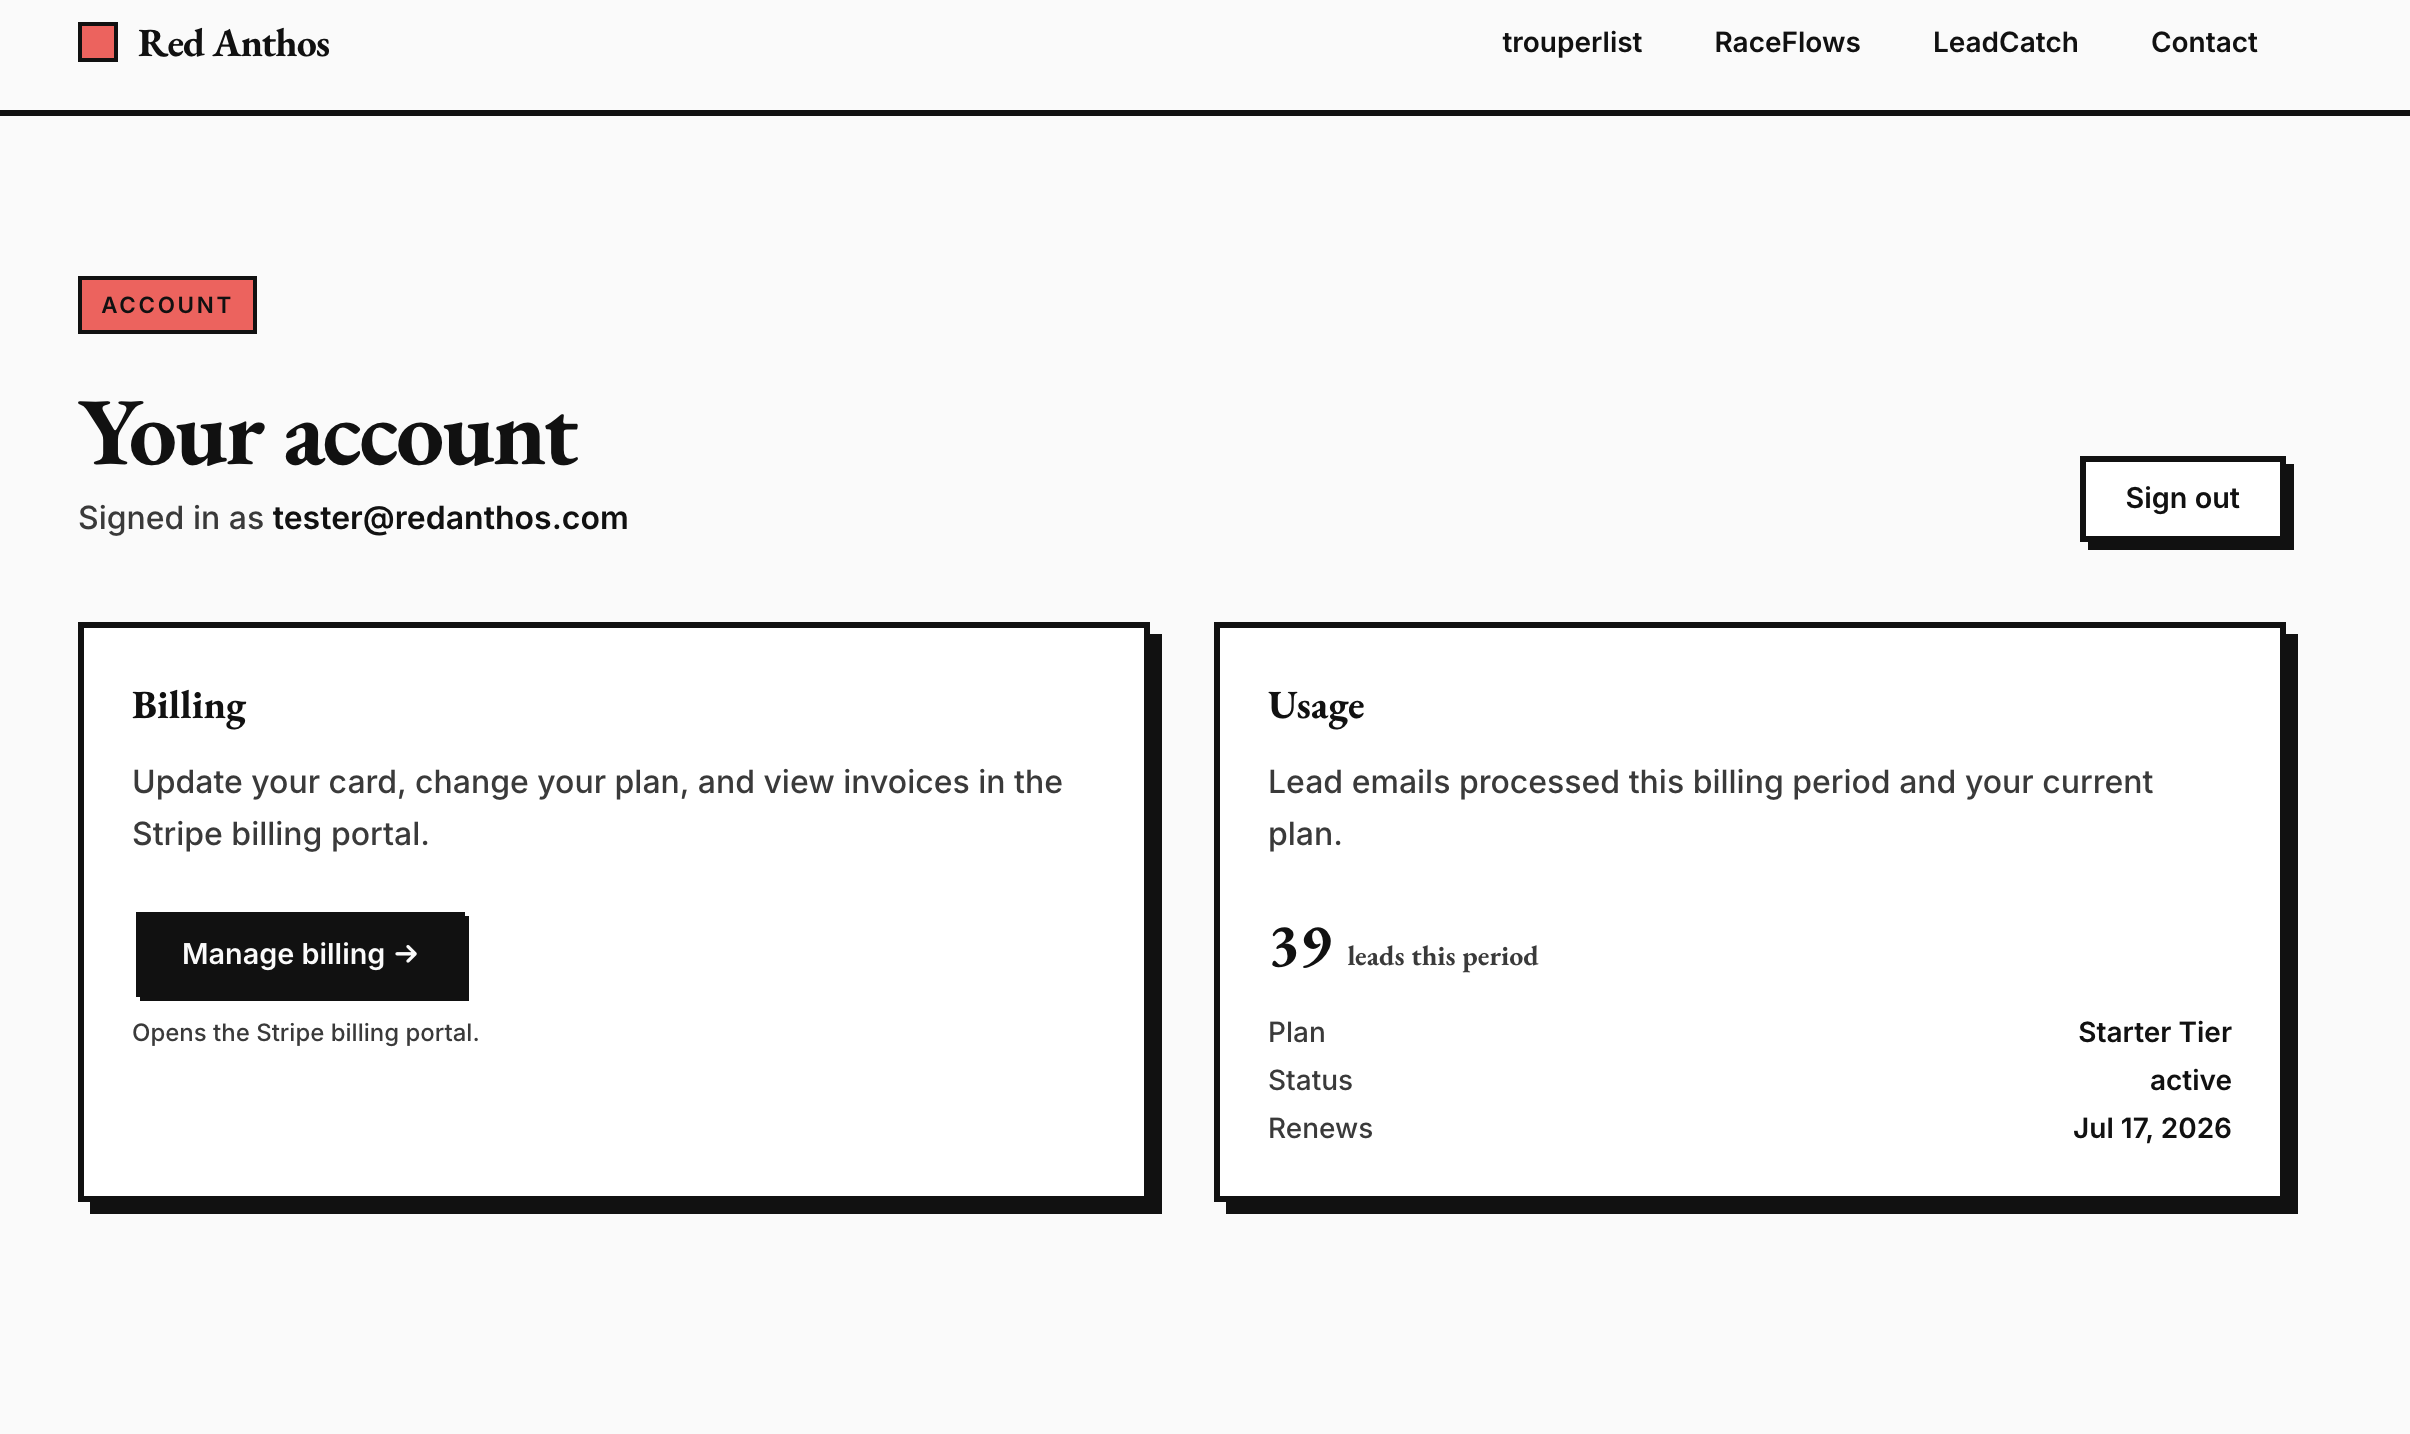
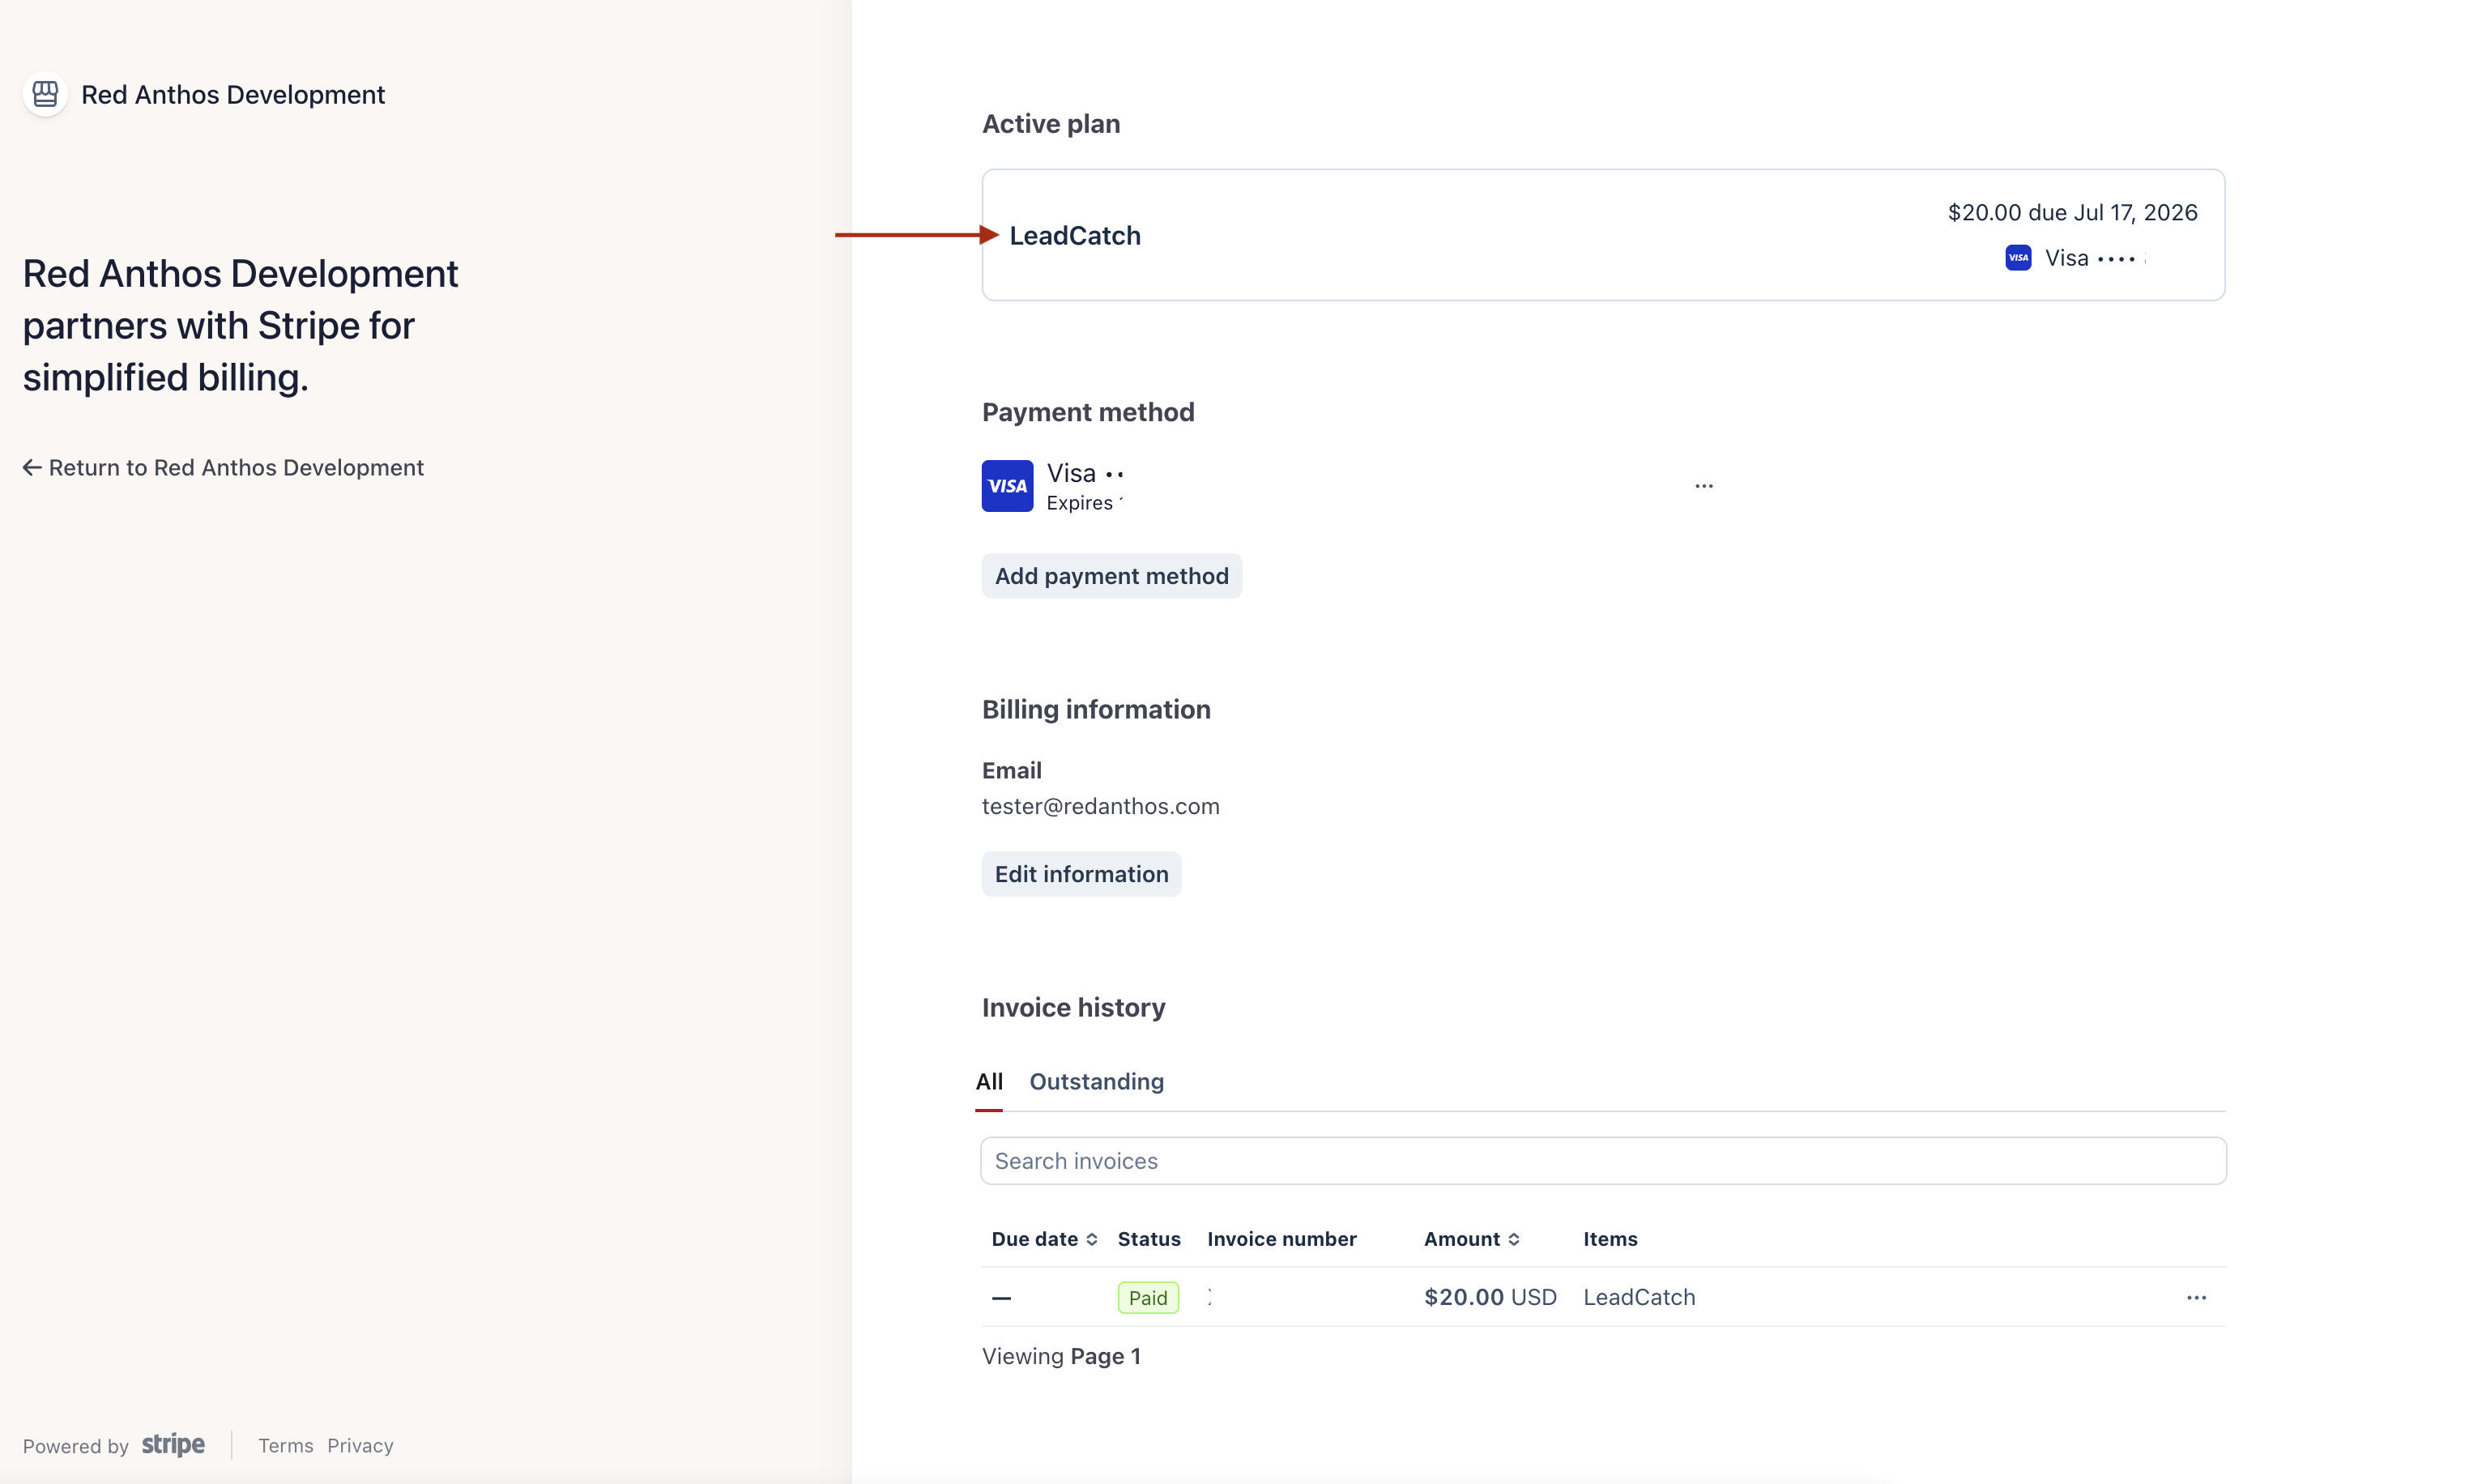
Cancelling is done from your Red Anthos account — not from HubSpot. From your account dashboard (also reachable via Manage subscription on the LeadCatch Settings tab), Manage billing opens the Stripe billing portal where you cancel.
- 01 On your Red Anthos account dashboard, click Manage billing to open the Stripe billing portal.
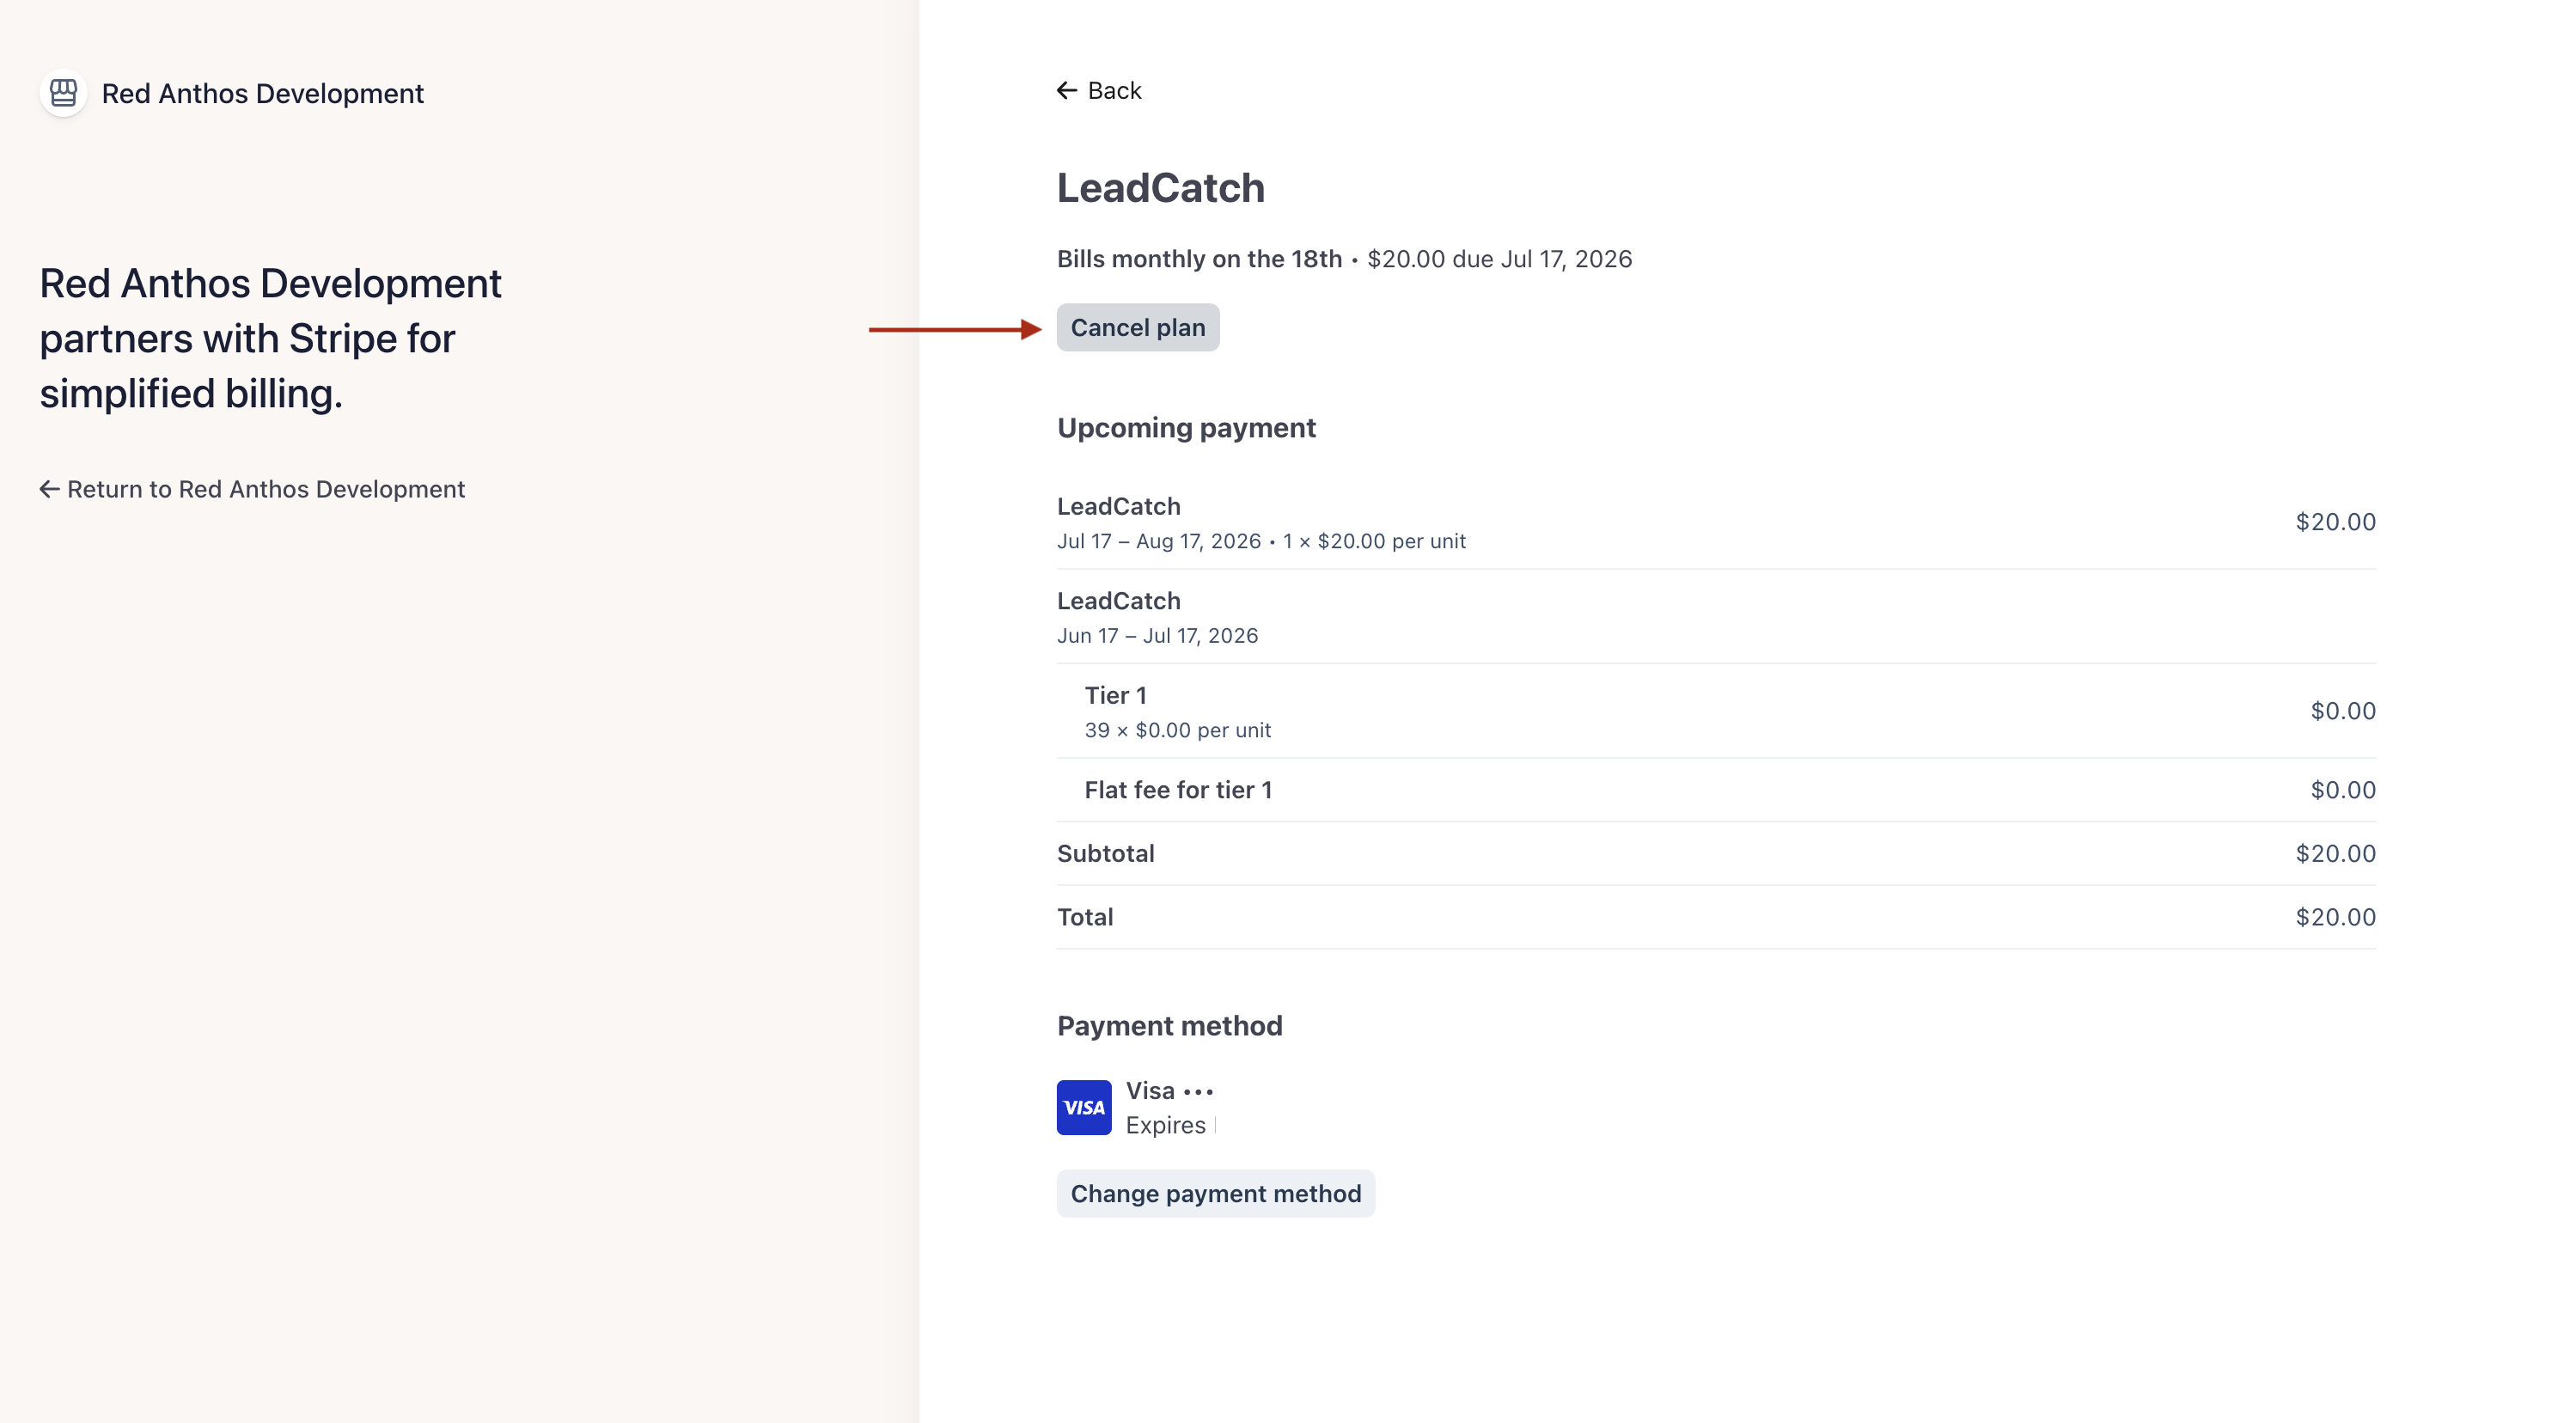
- 02 Under Active plan, click the LeadCatch subscription.
- 03 Click Cancel plan.
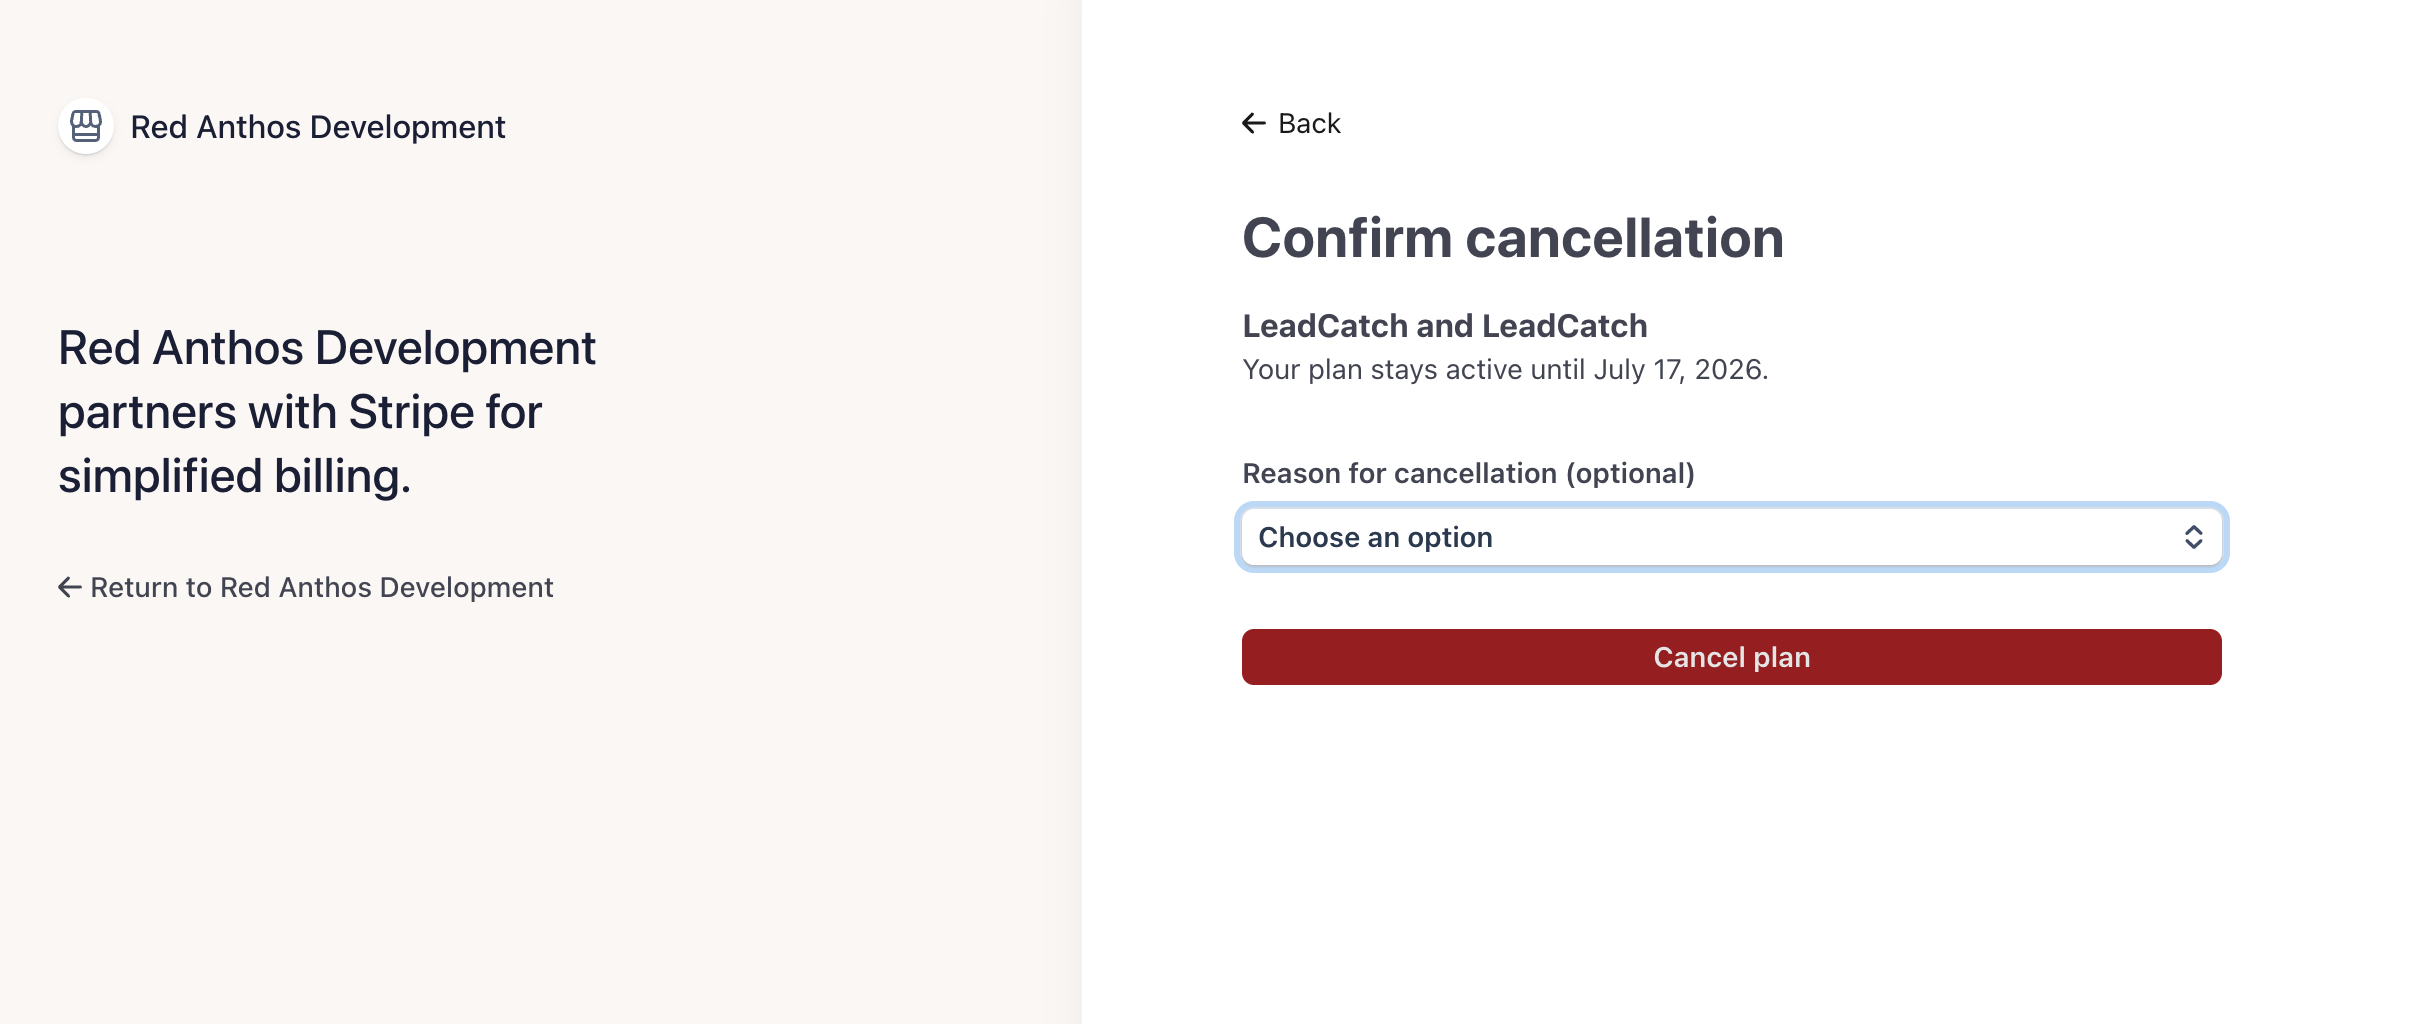
- 04 On Confirm cancellation, optionally pick a reason, then click Cancel plan. Your plan stays active until the end of the current billing period.
What cancelling does
- Your subscription ends at the end of the current billing period, and processing of new leads stops at that point.
- Any per-lead overage used in the current period is still charged.
- Cancelling stops billing and lead processing, but it does not uninstall the app from your HubSpot portal. To remove LeadCatch entirely, uninstall it in HubSpot as well (see below).
Uninstall the app
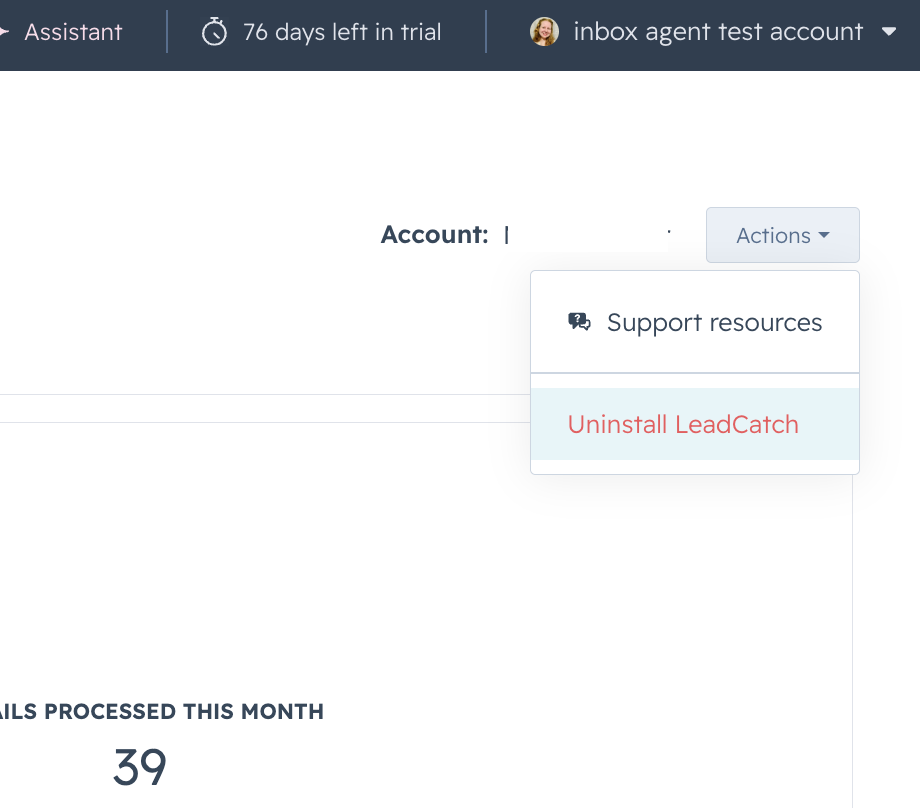
Uninstalling fully removes LeadCatch’s access to your HubSpot account. You can do it right from the LeadCatch app:
- 01 In LeadCatch, click the Actions menu in the top right and choose Uninstall LeadCatch.
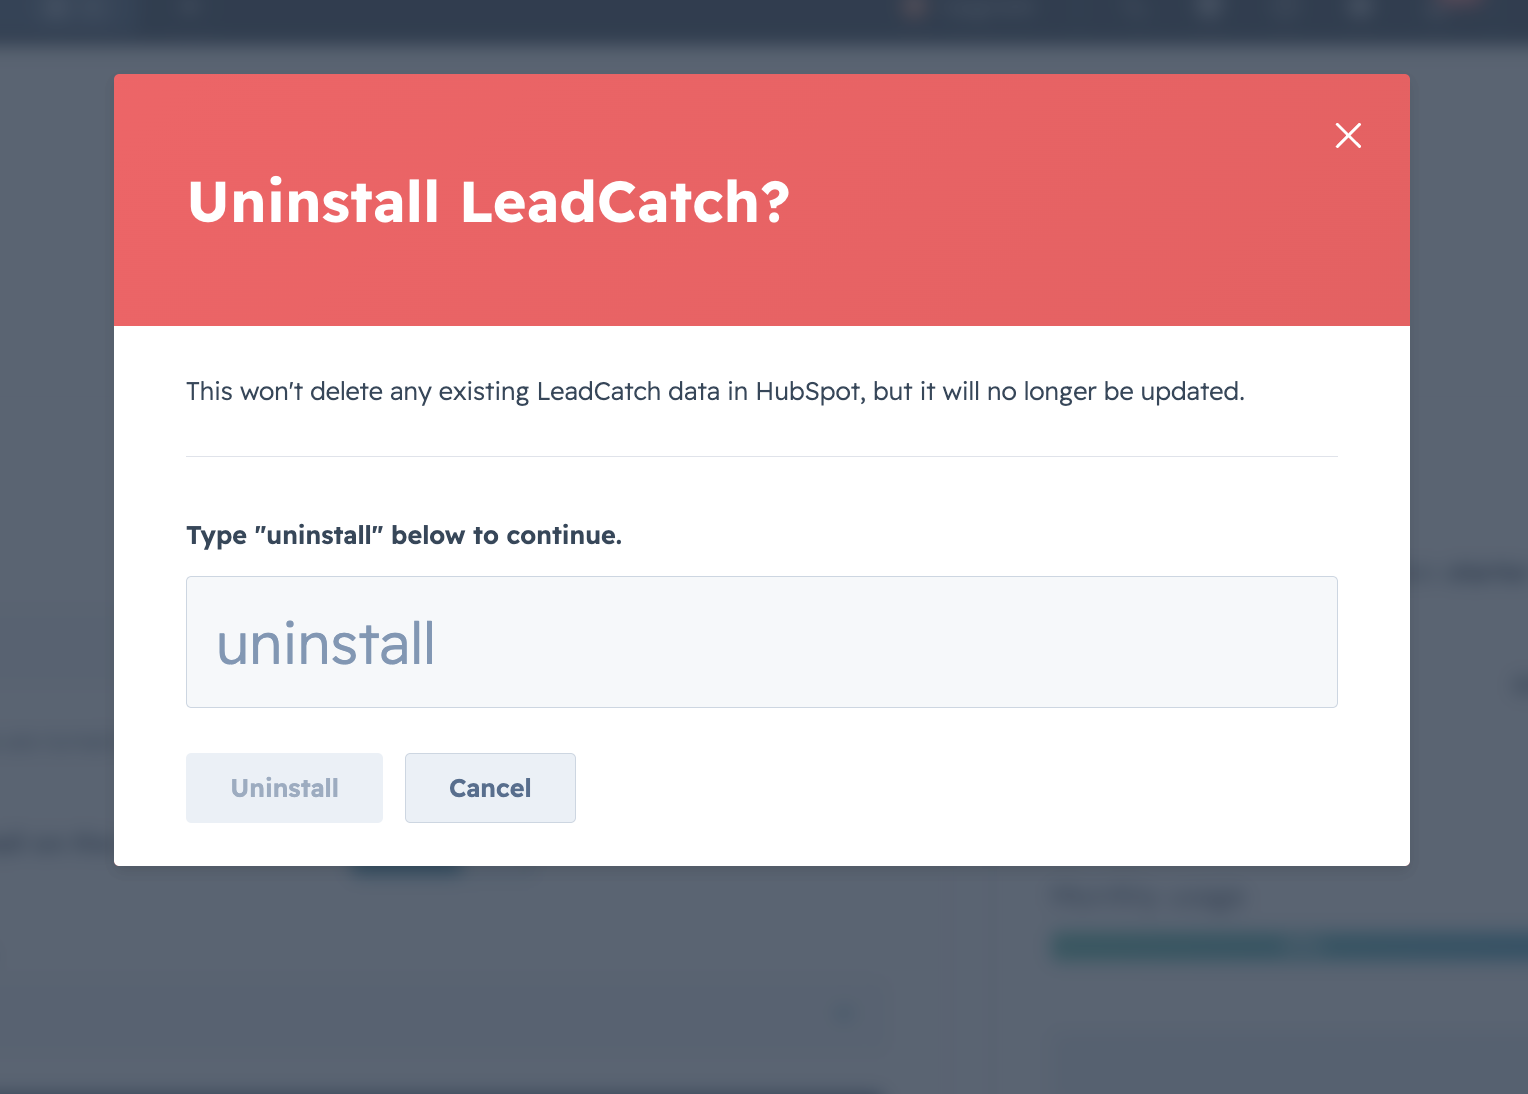
- 02 In the confirmation dialog, type "uninstall" and click Uninstall to confirm.
What uninstalling does
- LeadCatch’s access tokens are revoked and deleted, and it immediately stops processing new leads.
- Your subscription is automatically cancelled 14 days after you uninstall. If you reinstall within that window, your subscription reattaches.
- Important: uninstalling does not cancel your subscription right away. If your renewal date falls within those 14 days, you can still be charged for the next period. To avoid that, cancel in the billing portal as well.
- The contacts, notes, and Lead source properties LeadCatch already added stay in your HubSpot account — you keep every lead captured. If you reinstall later, LeadCatch starts fresh from new emails only.
Need help?
Questions about installing, configuring, or using LeadCatch? Get in touch and we will help you get set up.